How do I insert an image into a blog post using its URL?

Part 1 – Using the WordPress.com online editor

Photos in blog posts enhance the appearance, convey information that couldn’t be said in a thousand words, and act as magnets to pull the attention of readers to the story. All blogging editors provide a means of inserting pictures. When the item to be inserted is an image that resides already somewhere on the internet and its web address, properly termed its URL, the procedure it not so obvious.

Bloggers know that to embed an image in a post requires a bit of HTML code. Few of us are fluent and can just switch over to “Text mode” or “HTML mode” and type away.

If you are a WordPress blogger and use the online WordPress editor, I have good news for you. The WordPress editor provides the simplest possible way: Just paste in the URL where you want the image. Yep, it is that easy.

When you paste in the URL it shows as the text that it is, but a moment later the text is replaced with the image. I did this here, the URL on my clipboard was this:

askludwig-170129-03

Less than a second after pasting the URL it was replaced with the photo:

WARNING:
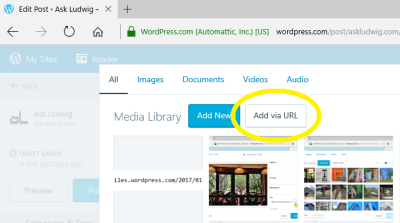
askludwig-170129-05If you are using the online editor at WordPress.com clicking the circled-plus, “Insert content”, option brings up the Media Library to permit choosing an image from the pictures there. On that page there are also to other options, Add New and Add via URL. Add New provides the process for uploading from your device.

You would think that Add via URL is used for embedding an image, the process we are talking about here. Not so! Add via URL places a copy of the image into your Media Library.

You may not want to store a copy of the image, indeed, you might not have permission to copy the image, just to use it in your blog.

Let me repeat the procedure to insert an image with the URL

  • Get the URL of the image into your clipboard. For how to do that see: How do I get the URL of an image in my WordPress blog?
  • Click on the place in the post where the image should go.
  • Paste the URL. On a Windows machine pasting is done with Ctrl+VCommand+V on an Apple device.

Next it gets a bit sticky

The image inserted by pasting the URL will be content-wide, that is the full width of your blog. What if you want it smaller and to one side or the other, like the illustration above?

Click on the image in hope of getting edit options and all that appears is a delete-X.

askludwig-170129-06

If you are happy with the full width picture, you are all set, but if you wish for more options you can switch to the more powerful Dashboard editor.

Save your draft, if you hesitate WordPress does it for you. Click My Sites, scroll down in the left pane and click WP Admin.

Part 2 of this mini-series covers Using the WordPress Dashboard editor.

.:.

© 2017 Ludwig Keck

How do I get the URL of an image in my WordPress blog?

The URL, or web address, of an image can be very useful. With it, the image is easily inserted in other blog post, web sites, or social media posts. There are a couple of ways to obtain the URL of a photo that is in your WordPress Media Library.

The proper way to get a WordPress Media Library image URL

If you have been blogging for a long time, you are used to do your “housekeeping” in the Dashboard of your WordPress blog. Newer bloggers do all their chores right in the WordPress.com website and might not even be very familiar with the Dashboard. If you need help getting there, see How do I get to my WordPress Media Library?

  • Go to your Dashboard.
  • Click Media in the left pane.

askludwig-170128-01

  • Find the image that you are interested in. Click on it.

askludwig-170128-04

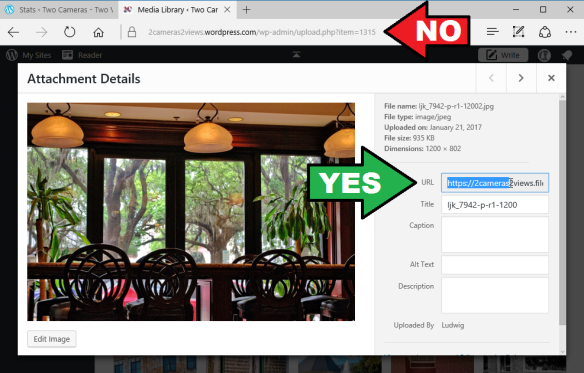
The image will be displayed along with some information fields.  You see two addresses, URLs, on this page. The one in the browser address bar is not the correct URL that you are after. That is just the page you are on, not the address of the image shown.

The URL of the image is in the field labeled, appropriately enough, URL.

  • Highlight the text in the URL field. Do that by placing your pointer, now a cursor, in front of the text, hold down the left mouse button and move the mouse to the right to scan over the text. The text in the field will scroll so that you can highlight all of it. Release the mouse button when all of the text is highlighted.
  • Press Ctrl+C to copy the highlighted URL (Command+C on Apple machines).

You now have the URL of the image on your clipboard and you can paste it wherever you wish to use it. The URL will have the form of this example:

https://2cameras2views.files.wordpress.com/2017/01/ljk_7942-p-r1-12002.jpg

Note that the first part of the URL is your blog address with “.files” between your blog name and “wordpress.com“. This is followed by a couple of numbers with slashes indicating the folder the image is in, and finally by the filename of your image.

Now the easy way

There is a quick and easy way to get the URL, or web address, of an image from your WordPress Media Library. Most bloggers these days do everything at WordPress.com. Once you are logged in there everything is at your fingertips.

  • askludwig-170128-08Here is how to do it:Click the Write link in the upper right area of the top bar.
    This opens an edit page for creating a new post. Don’t worry, this is just the easy way to get to your Media Library.
  • Click the circle with a plus sign – “Insert content“.

askludwig-170128-05
This opens a window into your Media Library. Find the image you are interested in, You may need to scroll down to do so.

  • Move the pointer over the photo. You will see a little pencil icon.
  • Click the pencil icon. See the illustration below.
    askludwig-170128-06

You will see the library page showing your image.

askludwig-170128-07On this page with the photo there are a number of text fields. One of them is labeled URL. To the right of that field is a button labelled COPY.

  • Click the COPY button. The button text will change to COPIED for a moment.

You now have the URL of the image on your clipboard and you can paste it to wherever you like.

  • Click CANCEL to get out of the Media Library.
  • Click away from the post editor – unless, of course, you are ready to tell the world of new-learned skill.

.:.

© 2017 Ludwig Keck

Can I reorganize my WordPress Media Library?

The short answer: No.

It is true, the WordPress Media Library is like one of those shoe boxes from the old days filled with pictures. Photos are added on top of the previous ones. There is no way to find a photo by tag or date taken. Well, it isn’t as bad as it seem, but first back to the answer.

The Media Library contains your images that you uploaded for use in posts. If you reorganized the contents of the library, moving photos into new folders by subject or some other indexing method, the URL of the images would change. Since the current URLs are used in your blog posts, those links would be broken. Your old posts would be all messed up. (That is not entirely correct, but I will leave that as a mystery statement for now.) Do not try to reorganize your Media Library even when it gets close to your storage limit with thousands of pictures. But don’t be disappointed that you can’t reorganize your library.

Here is the good news

Clearly you want to reorganize so you can find an image quickly. You actually can. Your photos are in reverse order of upload date. The most recent is at the top of the library. The very first image you uploaded is last. By default WordPress creates a folder for each month in which you upload images. You can easily reach any of those folders by clicking the All dates field. A drop-down menu lets you pick the folder for any month.

askludwig-170117-01This brings up the photos you uploaded in the selected month.

But wait, there is more!

askludwig-170117-06There is a Search field. Just type in that field and the images with matching text in their data fields, like Title or Caption, will be displayed.

The illustration here shows that the text “fl” was typed in the Search field. Two images come up.

Here is the first one:

askludwig-170117-04The matching “fl” is in the word “Butterflies” – the text does not have to be at the start of a word, it can be inside! The other images was a match because the word “Reflections” was in the title. Pretty neat, wouldn’t you agree? See, you really don’t need to reorganize!

.:.

© 2017 Ludwig Keck

How do I get to my WordPress Media Library?

Two ways come to mind. Reach in through a window or “walk” in through the dashboard. Sorry about this levity, but really these are routes to your WordPress Media Library. Let’s take the formal path first: Go to your WordPress Dashboard. The way there is by going in your browser to address yourblog/wp-admin, where “yourblog” is the web address of your blog.

If your blog is on WordPress.com, that is, the address is like blogname.wordpress.com, you can access the Dashboard by going to wordpress.com, click My Sites and scroll down to the bottom in the left pane. There click WP Admin.

askludwig-170115-05
askludwig-170115-06a

Notice the red arrow in the illustration above. It shows the URL of your Dashboard when you move the pointer over the WP Admin link.

In the Dashboard click Media in the left pane, or Library in the drop-down menu.

Here you can also see, in the lower left of your browser window, the URL of your Media Library.

Yes, of course, I could have told you about this address first, but it is just a little more complicated, that is longer, and harder to remember.

Your Media Library is the online location where your images, and some other media, are stored for use in your blog posts.

The storage order is by upload. The earliest item is at the bottom of this possibly very big “shoe box”. The most recently uploaded image is at the top.

askludwig-170115-18

Now I did tease with another way to get into your Media Library. It is a little convoluted and not at all intuitive, but for some tasks it is the easier way.

Once again you can start at WordPress.com. Click My Sites, then Blog Posts. Either open to edit an existing post or click Add. This gets you into the online WordPress Editor.

Click the circled plus icon to insert content, and a window to your Media Library opens. You can pick an image to insert into your post, but you can do a number of other tasks. We’ll save those for another article.

askludwig-170115-12

Next question, please.

.:.

© 2017 Ludwig Keck