How do I install SkyDrive in Windows Explorer?

Microsoft released a preview version of the app “SkyDrive for Windows” that adds SkyDrive to Windows Explorer imageand allows accessing SkyDrive as if it were just another folder on the computer.

It is just a simple download and a quick install. This works for Windows 7 and Windows 8.

Here is the download site:

Download SkyDrive for Windows

Click the above link, you will next see the download banner. Click Run. Sign in to your Microsoft Account and follow the dialogs.SkyDrive-NEW-12

In about a minute there will be a SkyDrive listing in Windows Explorer, in the Favorites section as shown in the illustration above.

Presently that entry cannot be expanded like other folders, however it works the same in the main pane.

It takes a bit to synchronize Windows Explorer with your SkyDrive – there is still the Internet download and upload delay – but shortly SkyDrive will work like any other folder.

imageAnd, yes, you can now drag and drop folders, including contents and sub-folders, right into SkyDrive.

Do keep in mind that your Internet connect speed will affect how quickly this takes place.

This is a much needed improvement and will make SkyDrive a much more useful feature.

.:.

© 2011 Ludwig Keck

How do I link multiple Windows Live accounts?

UPDATE – July 2013: Sorry folks, Microsoft no longer allows linking of accounts.
The post below is no longer of use. Bummer.

Windows Live with SkyDrive and Hotmail makes the “cloud” experience fast and easy. If you have more than one account, linking them makes switching between then a one-click operation.

Many folks have more than one account, a personal one, and maybe a work-related account. Linking them makes switching easy, but does not affect the files or organization of either account. link-10Each account still keeps all its settings and preferences, all the folder and album organization.

Linking the accounts is also straight-forward, here is how to go about it:

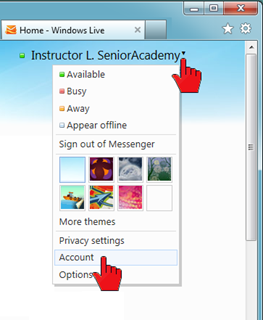
Click on your name or move the pointer over the down-pointing arrowhead behind your name (top-right of window). See the illustration. On the drop-down menu click Account.

Sign in to the page with your password. On the Account overview page, toward the bottom, in the Other options sections, click on thelink-11 Linked IDs link.

The Manage linked IDs page shows what accounts are linked and has an Add linked ID link.

Click it to proceed to the Link a Windows Live ID page.link-12

link-13Once more your password is needed. Type in the credentials for the account you wish to add. Then click Link.

The Manage linked IDs page now shows the linked accounts. Note that there is an Unlink option to the right of each linked account name – you can unlink an account at any time.

How do you switch accounts?link-15

With linked accounts all you need to do is click on your name or move the pointer to the down-pointing arrowhead behind your name.

The drop-down menu will show the linked accounts at the bottom. The active, displayed, account is highlighted. Just click on another account and the switch is made.

Note the other options on the drop-down menu. I like to assign different themes to my different accounts to keep myself reminded of which account I am in.

I also set Keep me signed in on the sign-in page. This way I do not need to sign in each time I want to visit SkyDrive or my mail.

.:.

© 2011 Ludwig Keck

Can I send photos to a SkyDrive album via email?

Update 6 April 2012: As of May 2012 this feature will no longer be available.

Yes, you can send photos to your SkyDrive albums via email. Windows Live SkyDrive offers a large amount of free storage and some nice photo album features. Normally you upload with a drag-and-drop procedure or, even easier, directly from Windows Live Photo Gallery.

ULbE-01pSending photos to a prime-level SkyDrive album via email is another very useful option. The procedure must be enabled first.

Here is how:

Log in to your Windows Live account. In the upper right corner click on your name. In the drop down menu, click Options. See the red pointers in the illustration here.

imageOn the options page in the lower right corner find and click Email publishing.

This takes you to the Email publishing page. Most of the page is greyed out until you click the Turn on email publishing check box.image

When the form is enabled, there are four steps:

  1. Enter the email address (up to three) from which photos can be sent to a SkyDrive album. Note that photos sent from any other address will not be delivered to the album, the email will just be lost.
  2. Enter a “secret” word. This will become part of the address for sending the photos. This is just used to make the process more secure. (No spaces in this word!)
  3. Select album codes. This is an optional step, codes, three-digit numbers, are pre-assigned to your albums. You can change these, but the ones offered will work just fine.
  4. Click the Save button.

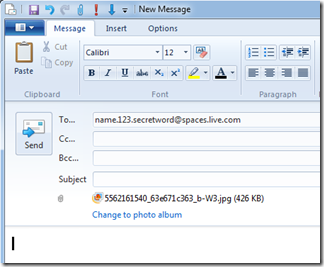
Once you have saved the information, there will be a display of the email addresses for sending the photos. Each album – and this is only for the prime-level albums, it does not work for albums inside other albums – has a unique email address. The address looks like this: name.album.secretword@spaces.live.com. Where name is a name derived from your name, it may be slightly different from your user name – be careful with that! The album will be the three digit album number (or other, if you changed it) to identify which album it is. The secretword is the word that you specified.

imageTo send photos to an album you must originate the email from an email address you specified on this page. Attach the photo or photos to the email. Do not use the Photo album feature in Live Mail. Do not “Change to photo album”.

Be sure to use the correct email address from your Email publishing page.

If using Hotmail use Insert: Attachments, do not use the Photos link.

Enter a subject and message if you like so you can find and see the email in your sent messages. Only the photos get to your album, no messages, no hint that they were sent via email. Only JPG photos can be sent to albums, this does not work for sending documents, just pictures.

.:.

© 2011 Ludwig Keck

Can I re-import photos when the computer says no new photos were found?

On occasion you will get a dialog that says “0 new photos and videos were found” when you try to import pictures from your camera.Import-01 This happens if you already have imported those photos, even though you might have deleted or moved the pictures on the computer.

Can you re-import the photos? You can, provided that you did not erase them on the camera. We are assuming here that you have set up your computer to use Windows Live Gallery to import photos from your camera. Just click the Next button (see illustration). In the next window you will see the photos on your camera arranged by date. It will say “0 items selected in 0 groups”. Note that the check box in front of the groups is not checked.

Import-02Import-03

Click on the group check box that you wish to import again. There is also a “Select all” option. Make sure you have selected just the ones you wish to import once more. Click Import and the process starts.

Import-04While the photos are being imported you will see the progress in a dialog like the one shown here. Note the check box with the legend “Erase after importing”. This means “erase from the camera after the photos have been imported to the computer”. I always leave that unchecked, which is also the default. This way the photos stay on the camera.

So what happens if you already have the photos on your computer? A new set will be imported, if the file name already exists, the import process will add a number in parenthesis at the end of the file name for the new file. You will wind up with duplicated photos. No harm will be done to photos that are already on your computer. Of course you can delete the duplicates.

.:.

© 2011 Ludwig Keck