The taskbar in Windows 8, and earlier versions of Windows, provides a very convenient place to manage your tasks, keep track of them and launch applications. 
You can pin shortcut icons for applications, even documents and folder to the taskbar. In addition there are a number of toolbars than can be placed on the taskbar to make this even more powerful.
The “Links” toolbar is one of these. It provides a quick way to launch Internet Explorer and go to a favorite site.
First you have to have some websites marked as “favorites” so you can get back to them quickly. When you are viewing a site and wish to mark it for future visits,  click the star near the top right the browser window. Click the down-arrow by the “Add to favorites” command, then click Add to Favorites bar. See the red arrows in the illustration. There are some other ways to accomplish this task, you may prefer another.
The “Favorites bar” will get turned on. This lets you get to your most often needed sites with just a click.
Before long you will have more favorites sites than fit on the bar and you need to click on the double-chevron at the end of the bar to see the rest.  You might also prefer to not have this bar take up real estate in the browser window. You can turn it off by right-clicking in the top area and unchecking the tool bars. Those that are checked will be displayed.
So what good is a “Favorites bar” if it is turned off?  You still have quick access to your favorites with the “Links” bar on the task bar. If you don’t see it there, right-click on an empty spot on the taskbar. In the pop-up, click on Toolbars. Then click Links so the checkmark shows.
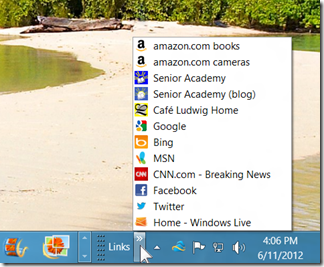
You will now have the Links toolbar. Move the pointer to the area where the double-chevron shows and click, the menu that pops up shows all your sites on the Internet Explorer Favorites bar.
You can edit the names, you can rearrange the order by just dragging the listings up or down. You can, of course, also change the size of the taskbar and the toolbars that are on it. With the taskbar not locked, you can drag the taskbar top edge to change the height, you can drag the dimples at the end of the toolbars to resize them. Here is a view of part of my taskbar so rearranged.
Some things that are possible, are not necessarily good ideas. Having the Links toolbar, however, is very useful.
.:.
© 2012 Ludwig Keck


 “This folder is not shared”.
 This brings up a dialog where you can specify email addresses and other specific ways to share. To make the album public click Get a link.
 This next dialog has a Make public button.
 You can copy this web address and share it with your friends. There is also a Shorten button. Clicking that provides you with a shorter web address.
 The information pane will now show that the folder is shared with Everyone. There is an X to the right of this setting, the normal “delete” icon. Click that to remove the permission.


 You now have an shortcut on the desktop that looks about as shown here. For a better looking icon, right-click the shortcut, click Properties, then click Change icon. Click OK in the complaint dialog.

 Click OK to close the Properties dialog.