Can I send photos to a SkyDrive album via email?

Update 6 April 2012: As of May 2012 this feature will no longer be available.

Yes, you can send photos to your SkyDrive albums via email. Windows Live SkyDrive offers a large amount of free storage and some nice photo album features. Normally you upload with a drag-and-drop procedure or, even easier, directly from Windows Live Photo Gallery.

ULbE-01pSending photos to a prime-level SkyDrive album via email is another very useful option. The procedure must be enabled first.

Here is how:

Log in to your Windows Live account. In the upper right corner click on your name. In the drop down menu, click Options. See the red pointers in the illustration here.

imageOn the options page in the lower right corner find and click Email publishing.

This takes you to the Email publishing page. Most of the page is greyed out until you click the Turn on email publishing check box.image

When the form is enabled, there are four steps:

  1. Enter the email address (up to three) from which photos can be sent to a SkyDrive album. Note that photos sent from any other address will not be delivered to the album, the email will just be lost.
  2. Enter a “secret” word. This will become part of the address for sending the photos. This is just used to make the process more secure. (No spaces in this word!)
  3. Select album codes. This is an optional step, codes, three-digit numbers, are pre-assigned to your albums. You can change these, but the ones offered will work just fine.
  4. Click the Save button.

Once you have saved the information, there will be a display of the email addresses for sending the photos. Each album – and this is only for the prime-level albums, it does not work for albums inside other albums – has a unique email address. The address looks like this: name.album.secretword@spaces.live.com. Where name is a name derived from your name, it may be slightly different from your user name – be careful with that! The album will be the three digit album number (or other, if you changed it) to identify which album it is. The secretword is the word that you specified.
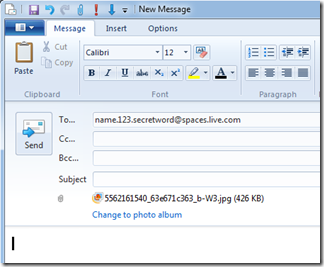
imageTo send photos to an album you must originate the email from an email address you specified on this page. Attach the photo or photos to the email. Do not use the Photo album feature in Live Mail. Do not “Change to photo album”.

Be sure to use the correct email address from your Email publishing page.

If using Hotmail use Insert: Attachments, do not use the Photos link.

Enter a subject and message if you like so you can find and see the email in your sent messages. Only the photos get to your album, no messages, no hint that they were sent via email. Only JPG photos can be sent to albums, this does not work for sending documents, just pictures.

.:.

© 2011 Ludwig Keck

How do I upload photos to my SkyDrive?

There are several ways to copy pictures to Windows Live SkyDrive. They can be “pushed” up using Windows Live Photo Gallery (see: How do I upload photos to SkyDrive using Windows Live Photo Gallery?) or they can be “pulled” up form SkyDrive. This second method is the topic of this post.

Here is a step-by-step procedure:

  • Sign in to your Windows Live account. Internet Explorer likely will remember you and sign you in when you go to home.live.com.
  • On your Windows Live home page click on Photos in the menu bar at the top.

image

  • imageClick on the album where you want to add photos. If the album does not show, click View all albums in the nav bar on the left.
  • Click Add photos on the menu bar.
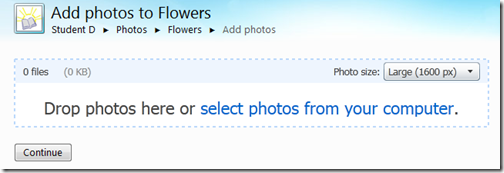
  • The “Add photos” page provides for two ways to copy photos to the album. You can drag photos from a Windows Explorer windows, however, this method is not available on all browsers. The other way is to click “select photos from your computer”.

image 

  • An “Open” dialog window opens. This is actually Windows Explorer. It likely will open to a document folder, so maneuver to the correct folder where the photos are.
  • Select the photos to upload in the normal way – click the thumbnail, hold down the Ctrl key to select more. The other ways work just fine.
  • Click Open (lower right).
  • The thumbnails will start to appear on the SkyDrive page. The default size of the photos to be uploaded is “Large (1600 px)”. If you wish the photos to be scaled to another size, or to maintain their original size, select the option by clicking the size button.
  • Click Continue (it will be unavailable until the “Open “task is completed.image

You will next see a message like at right advising that you are done.


That’s all there is to uploading photos to an album on your SkyDrive.


How do I upload photos to SkyDrive using Windows Live Photo Gallery?

SkyDrive is your free storage and sharing location provided by Windows Live. A number of applications “know” how to upload to SkyDrive and make the process very easy. Windows Live Photo Gallery is one of those programs.image

To tell Photo Gallery about your SkyDrive, simply sign in to Photo Gallery. Over on the upper right side there is a Sign in link.

Click Sign in, then sign in with your Windows Live ID. Once signed in, Photo Gallery will remember and you need not sign in each time.

To upload photos, select them – just click the thumbnail image. If you wish to select more than one, hold down the Ctrl key while clicking on the desired thumbnails. If you have a group of photos in consecutive order you can click the first one, then hold down the Shift key and click the last one. imageTo select all the photos shown in the gallery click Select all on the Ribbon with the Home tab selected (or hold down the Ctrl key and press A ). Be careful with that. This will select thumbnails that are scrolled off the view.image

Selected thumbnails will be highlighted so you can see which ones are selected.

To upload the selected photos click on SkyDrive in the Share group on the Ribbon. If you are not signed in, you will get a sign in dialog here. Then you will see a dialog somewhat like this:

image

There are a number of choices to make in this dialog. Note the Photo upload size – the default is “Large (1600 px)”. Click the down arrowhead for other size options. Note that you can also select Original to upload the photos in their full size. The option Medium (600 px) is ok for photos that are meant only for online viewing. When you select other than Original your photos will be scaled down if the horizontal or vertical picture dimension is larger that the number shown. Smaller photos will not be resized.

In the main area of the dialog you can select one of your existing albums on the SkyDrive, you may need to scroll down if you have many.

The default is to create a new album. Note the text entry box wimageith the flashing cursor. Just type the name that you want to assign to the new album. For a new album, there is also a sharing selector. You can specify sharing here. Of course, you can change that later in SkyDrive.

When you have made your choices, click the Publish button which will now be available in the lower right of the dialog.

imageA dialog will show the progress of the upload process. Remember that this may take some time depending on the number and size of the photos selected.

It really is that simple. You can upload to an existing album or create a new one right from Windows Live Photo Gallery.