The Slow Computer Syndrome
A reader writes, “My computer speed has slowed dramatically. What can I do to increase the speed back to normal?”
Sound familiar?
Yeah, sadly that is the plight of most of us. Our computers seem to get slower and slower, and we all want them to run as perkily as when they were new. I don’t have a silver bullet, but I can offer some thoughts about why computers slow down and what you can do about it.
There are multiple reasons, let’s go down the list.
Computers accumulate detritus
Over time we add programs, apps these days, files, pictures, videos, documents, and much more. These don’t necessarily contribute to the slowing down, but many cause update checks, statistics reporting, and some might even be malware. The first step is to do some “spring cleaning”.
Step 1 — Remove programs no longer needed
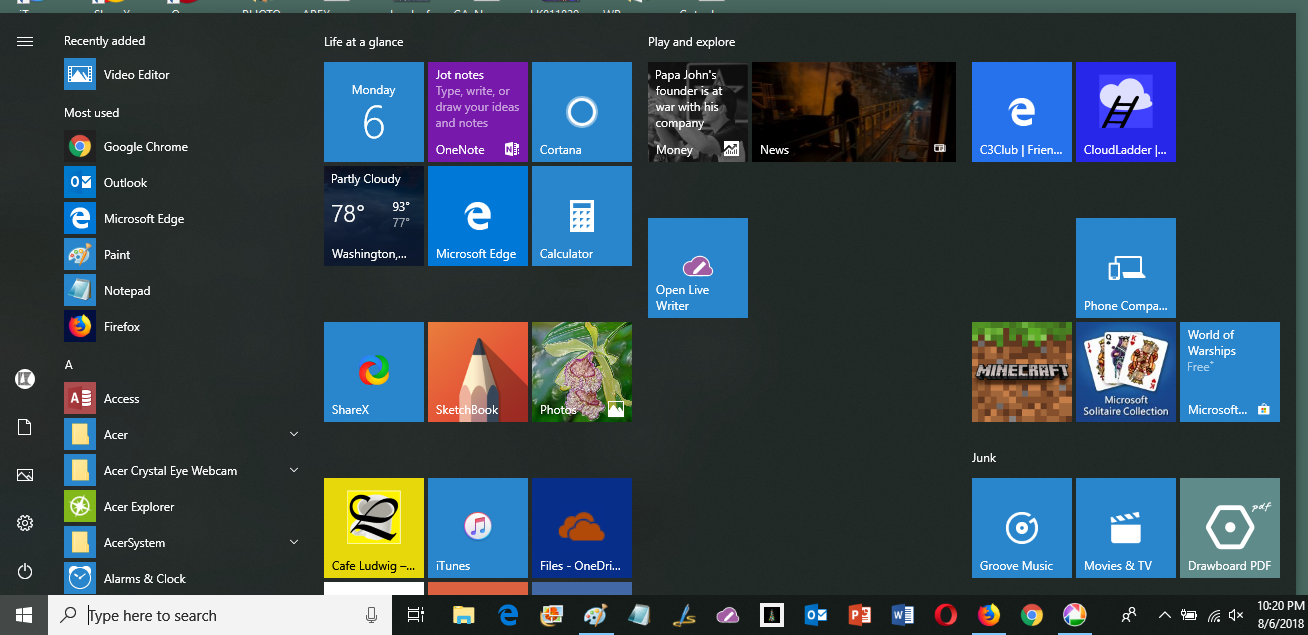 Get a notepad and pencil to jot down things to do. Press the Windows key and take a look at your start panel. Anything there you don’t use anymore? Jot down items to remove. Scroll down the apps list. Anything there you can do without? Jot it down.
You can also right-click on the icon or listing of an unneeded item and click the Uninstall option. Or you can finish your review, make your list and then proceed to get rid of the junk.
When you have finished your review and have a list of things to remove. Click the Settings wheel. Click Apps. Go down the list. Be very careful, there are apps that your computer needs to function. If you recognize it as something you no longer use, click on it and click Uninstall.
Step 2 — Remove any unneeded files
Cleaning out your own files, documents, pictures, videos, music, and more is the hardest part of the “spring cleaning” chore. It is easy for us to say, “I’ll come back to that another day”. Well, this is that day. Do don’t have to be totally thorough with this chore, but do make an effort.
Step 3 — Scan for and remove any malware
When you have removed the major unwanted stuff it is time to check for malware. You may have Windows Defender running and taking care of things all along. Open Defender and do a Device health check. There may be some recommended action for you to do. Do NOT be tempted to do a Fresh Start – that removes way too much of what you have worked hard to add to your machine.
You may also use a tool like Malwarebytes. Do make sure that you have only one malware defending program running. Having more than one tends to be more trouble than it is worth. The programs may even fight each other. Definitely multiple defense programs will slow your machine!
Step 4 — Do a cleanup
 There are many files that have accumulated on your PC that you can’t see such as cached images, temporary files, error logs and more. The Cleanup tool can take care of much these.
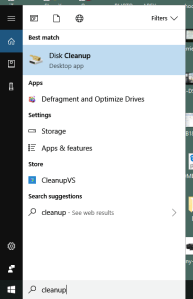
Type cleanup into the search box (lower left of the desktop). The Disk Cleanup app will be highlighted. Press Enter.
WARNING! Running this tool will likely remove passwords stored by your browser and other remembered settings. Be sure you will be able to sign back into sites and to set up your browser again the way you want it.
This chore may take a long time to finish. Let it do so while you don’t need the machine, maybe overnight.
Step 5 — Defrag your hard drive
If your PC uses a solid state drive, SSD, do not defrag it. If your drive is a rotating disk type defragging may be helpful. Type defrag into the search box to bring up this utility. Typically your machine will run this chore automatically. You can see the settings when you bring up this tool. If the defrag percentage shown is over 10% or so you may wish to run this utility. It will take a long time to finish. Time for lunch? Time for bed?
That was the easy part
After finishing the chores above your PC will function almost as well as it did when it was new, but you may still find that it is dreadfully slow. That is not your fault or your PC’s, it may well be due to external causes.

In the last few years much progress has been made in every nook and cranny. New machines have become amazingly more competent, the internet speeds too have gone up, your ISP may have upgraded your access speed. But hand in hand with that your “apps” have become more dependent on internet services. The websites too have loaded up many more images, videos, music tracks, tons of advertising. All that requires more downloading time and more resources inside your machine.
 If your PC is an older model it may not have as much memory as all this churning demands, it will make up for that by using your had drive to store the temporary data, images, sound, video etc.
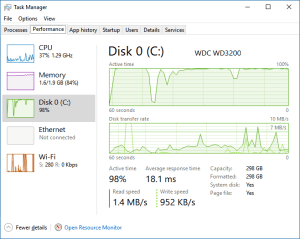
Here is what Task Manager shows when my little old laptop is working its heart out. The hard drive is working 100 percent of the time almost continuously. Finding the needed stuff and writing new stuff causes the access time to become long and that makes the PC dreadfully slow.
To make matters worse, Microsoft releases updates very frequently. Your machine may be trying to catch up and is downloading and installing stuff while you are trying to do other things.
So what can you do?
Several things in the way of changing your work habits.
Action 1
Give your machine time to do its chores like installing new software. Let it idle evenings or during lunch. Don’t turn it off or close the lid when you don’t need it. Let it run.
Action 2
Have only one browser running at a time. Have only one or two tabs open at any one time. That is probably the hardest to do. Having a dozen tabs open makes it easy to go from Facebook to your bank, your mail, to Twitter, to the many other websites you want ready at hand. Don’t keep them open. They communicate with your machine and all that takes resources and time. Instead set up you Favorites bar with the links to places you frequent, then visit them one at a time.
Try it. Even you will be more relaxed and your machine may just seem that it can still keep up with the world.
.:.
© 2017 Ludwig Keck


 .:. © 2024 Ludwig Keck