How do I manage the layout of text and images in my WordPress posts and pages?

The WordPress world has seen a lot of changes in the past few years, and everything seems new and different. The way the editors work in WordPress has been improved the most. Now everything is done with “blocks”. There are a large number of such blocks. For text with images many options exist. Using the Text and Image blocks is described in more detail here: CloudLadder – Layout with Text and Images.

That article helps you with the basics and allows showing images withing text pretty much as you see in magazines – and other sites. There are many more options and the CloudLadder site has (or will have) additional information.

.:. © 2024 Ludwig Keck

How can I size the logo my way on my WordPress.com site?

WordPress offers an amazing array of features and options on WordPress.com sites. Unless you are using the upgraded, pricey, Business plan (or higher), plugins to provide more options are not available.

Most themes that allow a logo to be displayed have a fixed, dinky, size for the logo. On the Twenty-Twenty-One theme it looks like this {using a a rather wide, low-height logo image):

Without any logo the appearance is plain and uninspiring.

How about using the logo as a background image? That would allow the logo to be sized in the uploaded art and get it just the desired size and placement. That gives us this:

The title block overlays the background image with the site name and menu over the logo art. Not at all acceptable.

Now you may have noticed that when a logo is displayed there is a wide strip provided for it. Can we get that strip even when no logo is used? No, there is no provision for that. However, there is a way!

What if we use a logo that does not show? A transparent image with nothing in it does the trick.

For this site, and this demonstration, I made a 800 pixel square PNG image and made it fully transparent.

And, voile, we have a site with a custom-size “logo”. A transparent image set as the logo in Site Identity and an image with the desired logo set as Background Image. The settings Fit to Screen with position top center and Repeat Background Image unchecked.

Note that the image was wide and not very tall, designed to fit just right.

There you have it. A way to size the logo your way.

.:. © 2021 Ludwig Keck

How do I insert an image into a blog post using its URL?

Part 1 – Using the WordPress.com online editor

Photos in blog posts enhance the appearance, convey information that couldn’t be said in a thousand words, and act as magnets to pull the attention of readers to the story. All blogging editors provide a means of inserting pictures. When the item to be inserted is an image that resides already somewhere on the internet and its web address, properly termed its URL, the procedure it not so obvious.

Bloggers know that to embed an image in a post requires a bit of HTML code. Few of us are fluent and can just switch over to “Text mode” or “HTML mode” and type away.

If you are a WordPress blogger and use the online WordPress editor, I have good news for you. The WordPress editor provides the simplest possible way: Just paste in the URL where you want the image. Yep, it is that easy.

When you paste in the URL it shows as the text that it is, but a moment later the text is replaced with the image. I did this here, the URL on my clipboard was this:

askludwig-170129-03

Less than a second after pasting the URL it was replaced with the photo:

WARNING:

askludwig-170129-05If you are using the online editor at WordPress.com clicking the circled-plus, “Insert content”, option brings up the Media Library to permit choosing an image from the pictures there. On that page there are also to other options, Add New and Add via URL. Add New provides the process for uploading from your device.

You would think that Add via URL is used for embedding an image, the process we are talking about here. Not so! Add via URL places a copy of the image into your Media Library.

You may not want to store a copy of the image, indeed, you might not have permission to copy the image, just to use it in your blog.

Let me repeat the procedure to insert an image with the URL

  • Get the URL of the image into your clipboard. For how to do that see: How do I get the URL of an image in my WordPress blog?
  • Click on the place in the post where the image should go.
  • Paste the URL. On a Windows machine pasting is done with Ctrl+VCommand+V on an Apple device.

Next it gets a bit sticky

The image inserted by pasting the URL will be content-wide, that is the full width of your blog. What if you want it smaller and to one side or the other, like the illustration above?

Click on the image in hope of getting edit options and all that appears is a delete-X.

askludwig-170129-06

If you are happy with the full width picture, you are all set, but if you wish for more options you can switch to the more powerful Dashboard editor.

Save your draft, if you hesitate WordPress does it for you. Click My Sites, scroll down in the left pane and click WP Admin.

Part 2 of this mini-series covers Using the WordPress Dashboard editor.

.:.

© 2017 Ludwig Keck

How do I get the URL of an image in my WordPress blog?

The URL, or web address, of an image can be very useful. With it, the image is easily inserted in other blog post, web sites, or social media posts. There are a couple of ways to obtain the URL of a photo that is in your WordPress Media Library.

The proper way to get a WordPress Media Library image URL

If you have been blogging for a long time, you are used to do your “housekeeping” in the Dashboard of your WordPress blog. Newer bloggers do all their chores right in the WordPress.com website and might not even be very familiar with the Dashboard. If you need help getting there, see How do I get to my WordPress Media Library?

  • Go to your Dashboard.
  • Click Media in the left pane.

askludwig-170128-01

  • Find the image that you are interested in. Click on it.

askludwig-170128-04

The image will be displayed along with some information fields.  You see two addresses, URLs, on this page. The one in the browser address bar is not the correct URL that you are after. That is just the page you are on, not the address of the image shown.

The URL of the image is in the field labeled, appropriately enough, URL.

  • Highlight the text in the URL field. Do that by placing your pointer, now a cursor, in front of the text, hold down the left mouse button and move the mouse to the right to scan over the text. The text in the field will scroll so that you can highlight all of it. Release the mouse button when all of the text is highlighted.
  • Press Ctrl+C to copy the highlighted URL (Command+C on Apple machines).

You now have the URL of the image on your clipboard and you can paste it wherever you wish to use it. The URL will have the form of this example:

https://2cameras2views.files.wordpress.com/2017/01/ljk_7942-p-r1-12002.jpg

Note that the first part of the URL is your blog address with “.files” between your blog name and “wordpress.com“. This is followed by a couple of numbers with slashes indicating the folder the image is in, and finally by the filename of your image.

Now the easy way

There is a quick and easy way to get the URL, or web address, of an image from your WordPress Media Library. Most bloggers these days do everything at WordPress.com. Once you are logged in there everything is at your fingertips.

  • askludwig-170128-08Here is how to do it:Click the Write link in the upper right area of the top bar.
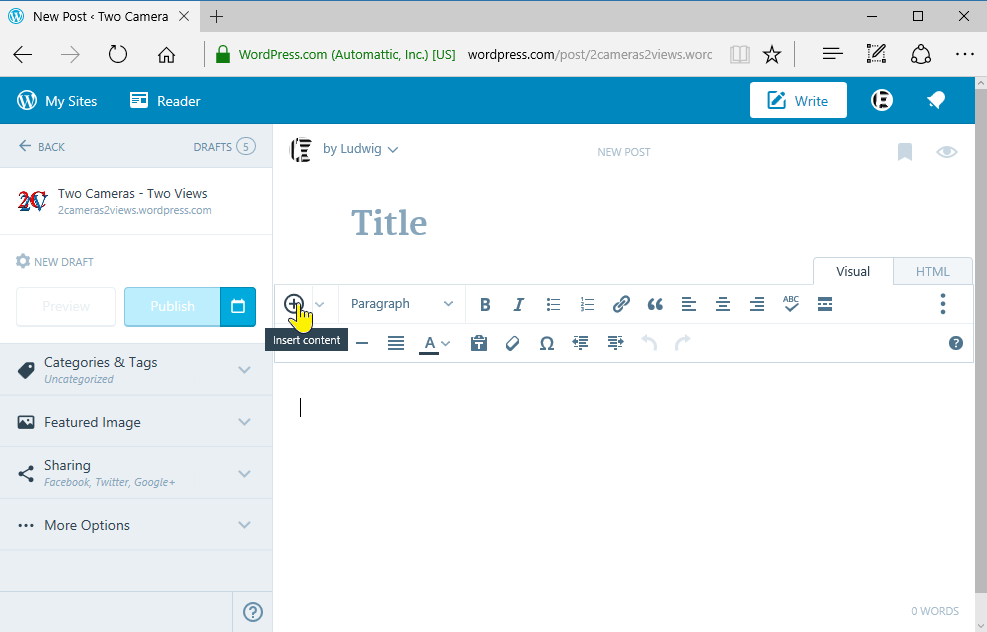
    This opens an edit page for creating a new post. Don’t worry, this is just the easy way to get to your Media Library.
  • Click the circle with a plus sign – “Insert content“.

askludwig-170128-05
This opens a window into your Media Library. Find the image you are interested in, You may need to scroll down to do so.

  • Move the pointer over the photo. You will see a little pencil icon.
  • Click the pencil icon. See the illustration below.
    askludwig-170128-06

You will see the library page showing your image.

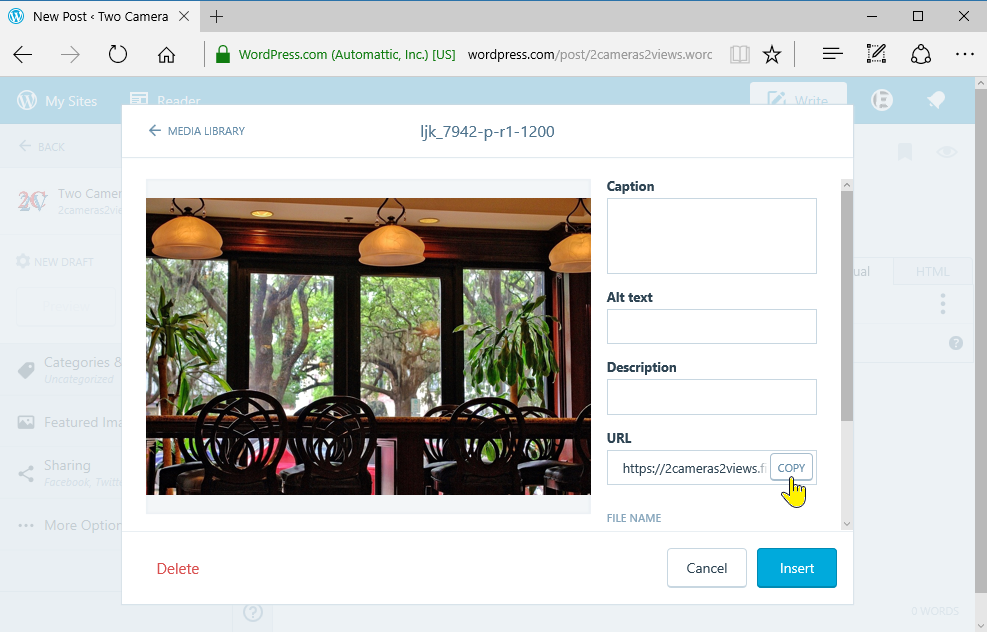
askludwig-170128-07On this page with the photo there are a number of text fields. One of them is labeled URL. To the right of that field is a button labelled COPY.

  • Click the COPY button. The button text will change to COPIED for a moment.

You now have the URL of the image on your clipboard and you can paste it to wherever you like.

  • Click CANCEL to get out of the Media Library.
  • Click away from the post editor – unless, of course, you are ready to tell the world of new-learned skill.

.:.

© 2017 Ludwig Keck