How do I set a shortcut for a website?

There are several ways to set a shortcut to a favorite website. Let’s answer this for users of Edge on Windows 10. Users of other browsers, please, ask in a comment for details.

Setting a Favorites Bar tab

The easiest is to create a new tab on your Favorites Bar right in your browser.

Click on the star at the end of the address bar.

In the dialog window you can change the name to whatever you want to call it in the new tab. The URL will be already filled in. If “Save in” shows Favorites, click it and select Favorites Bar. Then click Save and it will show in your Favorites Bar – at the end of other tabs.


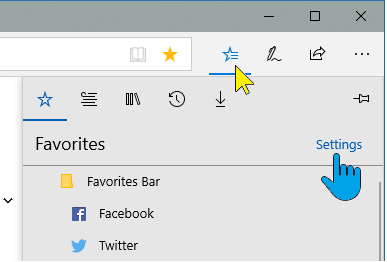
If your Favorites Bar is not showing turn it on by clicking the “starrish” icon – see the illustration here. Then click Settings.

In the Settings dialog look down just a bit and you will find Favorites Bar – Show the favorites bar and a slider control. Set the slider to the right – ON. Your Favorites Bar will be shown with your tabs.

Placing the Shortcut on your PC

If you want the shortcut on your PC, even when you don’t have the browser open, there are two easy places – In the Taskbar or in the Start area.

With the website loaded in your browser, click the three-dot icon at the top right. The drop-down menu provides two options: Pin this page to the taskbar and Pin this page to Start. Click whichever you like. Of course, you can set both. You will see the website icon on the Taskbar and/or in Start when you click the Windows icon or Start.

Shortcut on the Desktop

Most of us old-timers are used to having shortcut icons on the desktop. Getting one there is not quite so simple.

Go to the site in your browser you wish to set a shortcut for. Click in the address bar. The site URL will be shown as selected. Copy the URL with Ctrl-C.

Then right-click on an empty spot on your desktop. Click on New and then in the next drop-down menu, click Shortcut.

A Create Shortcut dialog window will open. Place the cursor in the field for the location of the item and use Ctr-V to paste the URL that you copied in the browser. Click Next.

In the text window replace the default text with the name of the website as you want it on the desktop.

Click Finish. You will now have a shortcut to the website on the desktop. When you double-click it it will open the browser and go to the site.

Unfortunately the image used for the desktop icon is not the identification icon of the website. You can change to some other image from the selection of shortcut icon images.

.:.

© 2018 Ludwig Keck

Advertisement

How do I create desktop shortcuts in Windows 8?

Windows 8 offers easy options to place a tile on the Start screen, “Pin to Start”, and to put an icon on the desktop taskbar, “Pin to taskbar”, but the method to create a desktop shortcut is not obvious at all. Here is how you can quickly put a shortcut icon on your Windows 8 desktop for any installed desktop program. This does not work for the Windows 8 style apps that only run in the non-desktop environment.

shortcuts-06

Press the Windows logo key to open the Start screen. Right-click on an empty space and click All apps in the bar at the bottom.

Find the program – you may have to scroll – and right-click its tile.

Now you get the options on the bottom for a number of tasks. Click Open file location (see the red arrows in the illustration). shortcuts-07This switches you to the desktop and opens File Explorer. The shortcut location for the program will already be selected. Right-click on the program name, move the pointer down to Send to then horizontally over to the sub-menu and down to Desktop (create shortcut). Click that.

That’s it. You will now have a desktop shortcut for that program on the desktop. You can position it as you like. The shortcut works as expected, double-click it to open the program.

shortcuts-08

.:.

© 2012 Ludwig Keck

What is “God Mode”?

“God Mode” is a cute name for an otherwise mundane search listing of the various options in Control Panel. Having all the features displayed in imageWindows Explorer eliminates searching through the menus and offers a real convenience. The different ways of showing the results in Windows Explorer are another benefit of “God Mode”. This tool is actually very simple and does not take up much space.

Here is how to install “God Mode” on your Windows 7 computer:

You need to create a folder in the boot disk of your computer. The common name for this is “Local Disk (C:)”. The new folder has to have a special name. The name can start with any word you like, but the part below, starting with the period, must be as shown.

  • Select the next line shown here and copy it to the clipboard by pressing Ctrl+C.

GodMode.{ED7BA470-8E54-465E-825C-99712043E01C}

  • imageOpen Windows Explorer – click the “Windows Explorer” icon in the Taskbar.
  • In the navigation panel, below Computer, click Local Disk (C:). imageYou may have to expand the Computer listing by clicking the arrowhead symbol in front of it.image
  • Click New folder in the menu bar.
  • imageThe name of the folder is already selected, highlighted, so you can type the desired name of the folder. Don’t type anything, just press Ctrl+V to paste the name you copied from this post. It will look like this:image
  • imagePress Enter to complete the naming process. The folder name will display as “GodMode” and be prefixed with the Control Panel icon.
  • To make this feature even more easily accessible, imageplace a shortcut icon on the desktop.
    Right-click the GodMode folder, move the pointer down to Send to, then to the right and click Desktop (create shortcut).
  • Close Windows Explorer.


You will now have a Control Panel shortcut icon on your desktop to invoke this feature. Double-click it, Windows Explorer will open and look about like this:

image

Here in one long listing you have all the control functions with good descriptive names. On my computers I get 278 items listed – more than I ever want to use, but, het, this is computing power. All the display features of Windows Explorer are, of course, available to make getting around in this list even easier.


© 2011 Ludwig Keck

.:.