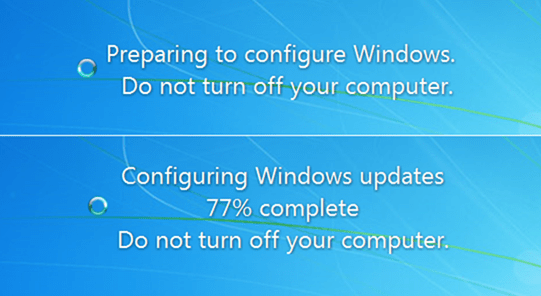
When it says “Do not turn off your computer” what happens if I do?

You see this message usually when your PC is installing updates and it is in the process of shutting down or restarting. If the computer is powered off during this process the installation process will be interrupted.

DNTOYC-5

The interruption can have several outcomes. The best is that when you restart your computer the process either continues or picks up from the start and you hardly notice that anything bad has occurred. It may be that the computer goes through several cycles trying to get the job done. That may take extra time but gets everything updated.

It can also happen that the process was stopped when it was already marked done but has not completed. The PC will show the update installed when in fact it reverted back to the prior version of whatever was being updated. This can be bad especially if some vulnerability was being corrected and that did not really happen. It is usually best after a power interruption to manually check for updates again.

The worst outcome can be that the process gets caught in such a way that it loops back to the same incomplete state. The machine might even be unusable as it tries over and over to complete the update. Intervention might be needed, restarting into safe mode, and starting the update process again.

One thing you normally do not need to worry about is loosing any of your data.

.:.

© 2015 Ludwig Keck

How do I pin Outlook to the taskbar in Windows 8?

How to pin Outlook to the taskbar in Windows 8, Windows 8.1, Windows 10

Outlook can mean a couple of different things these days. There is Microsoft Outlook, the desktop mail client that is part of Microsoft Office, there is also Outlook.com the Microsoft email service. Let’s take them up one at a time.

Office ProgramsOutlook – mail client

To pin the Outlook mail client to the taskbar do this:

  • Click Start, or press the Windows key on the keyboard.
  • Find the Outlook listing – you may need to scroll around a bit.
  • Right-click on Outlook
  • Click on Pin to taskbar

That’s it.

Outlook.com – the online email service

To pin a link to the Outlook.com site to the taskbar proceed as shown below.

NOTE: This only works if you are using Internet Explorer.

  • Outlook.comOpen Internet Explorer and go to outlook.com. Sign in.
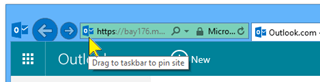
  • Find the little icon in front of the web address. See the illustration here.
  • drag iconPlace the pointer on the little icon. Note the tooltip “Drag to taskbar to pin site”.
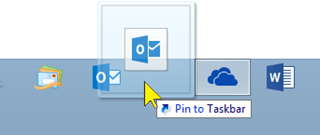
  • Drag the little icon down to the taskbar and release it on the taskbar.

That’s it.

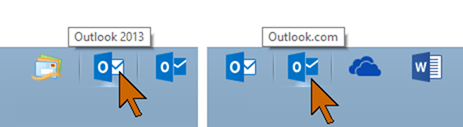
You can have both the mail client and the online outlook.com site pinned to the taskbar. The icons are very similar. The “white envelope” one is the Outlook client.

Taskbar icons

Outlook icons

.:.

© 2015 Ludwig Keck

How do I make a OneDrive album public?

Back a year and a half ago when OneDrive was called SkyDrive this same question was answered here. Of course, Microsoft has made a lot of changes since then and the details have changed. In fact, the current procedure is not at all intuitive and might frustrate a lot of users.

Microsoft intends your OneDrive to be your “file cabinet in the cloud”. It is meant for your private use, but you can share any folder, album, or individual item with a specific person, with anyone you provide a link to, or with everybody on the Internet anywhere in the world. This last “share” setting is usually referred to as “public”. If you wish to provide access to an item in your OneDrive to any and all readers of your blog for example, you need to make that item “public”. It’s sharing setting has to be “Everyone”.

Anything in a folder, or album, including sub-folders and items in the sub-folders will inherit the share setting of the folder. It is possible to have an unshared folder and somewhere inside you may have an item, album, folder, photo, or document, that you may wish to share publicly. That is possible. There are some disadvantages to such mixed up sharing that are beyond the scope of this article. It is best to maintain a clean,easily understood sharing structure.  Things available to the public should be in one main folder that is public. That makes adding public material straightforward.

Here is the procedure for making a OneDrive album public

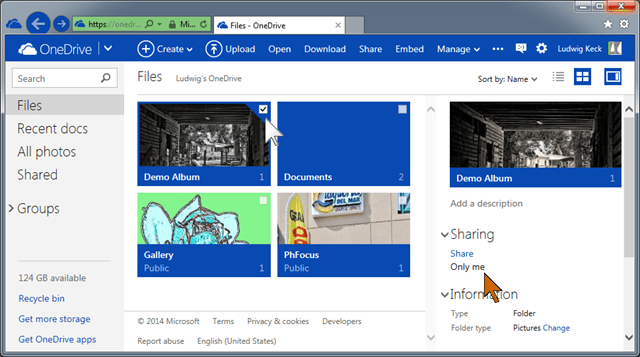
Create your folder or album that you wish to share with the world. By default a newly created folder is not shared, it is marked “Only me” as you can see in the illustration below. Note the white arrow, it shows that the folder has been selected. In the information pane the “Sharing” shows “Only me”.
OneDrive-140612-01a

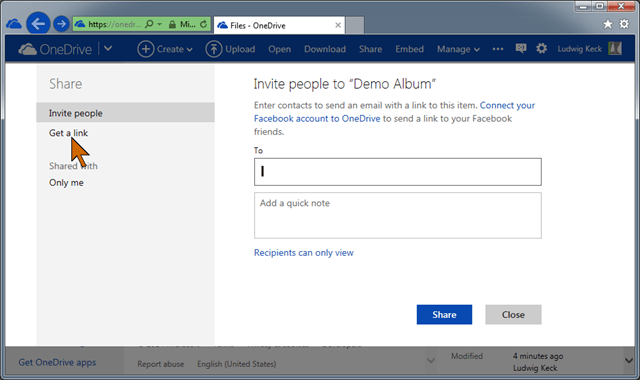
To share this folder publicly click the “Share” link in the information pane or the Share link in the menu bar. The next page defaults to the sharing with individual people option. Click the “Get a link” option on the left.
OneDrive-140612-02a

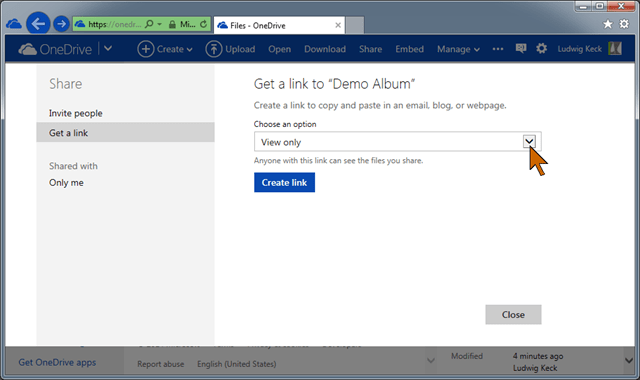
The next page may be confusing, as the “public” option is not apparent.
OneDrive-140612-03a

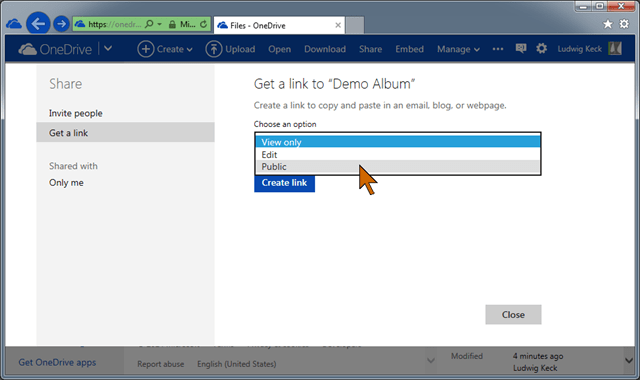
You may think that you want to get a link with the “View only” option and that is what is shown on this page. But note the options chevron (see red arrow). Click that! Now you see the “Public” option.
OneDrive-140612-04a

Click Public, then click Create link.

You will get a longish link in the window that you can copy (Ctrl-C) to provide to your readers. There is also an option to shorten the link.
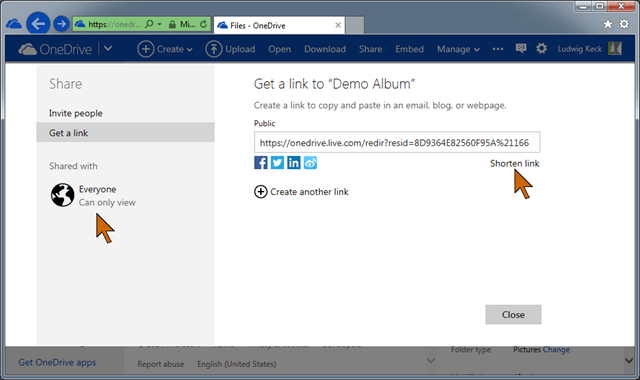
OneDrive-140612-06a

Also note that the folder is shown as being shared with “Everyone” and that the setting is “Can only view”.

You can use the long link or the much shorter one which is much easier to type by others, if that is needed.
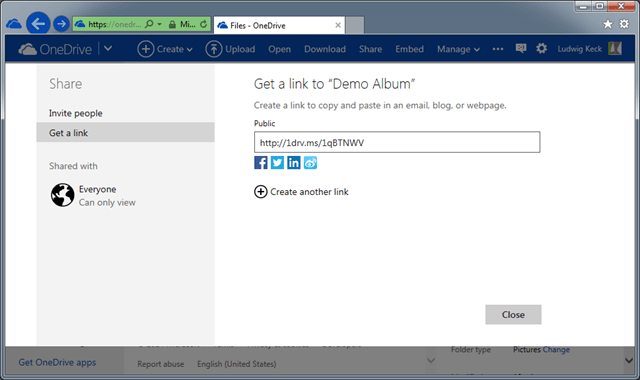
OneDrive-140612-07

On you main OneDrive page you will see the sharing setting right under the folder name. If the information pane is showing you will see the sharing setting there also. The globe symbol indicates that the folder is now public.
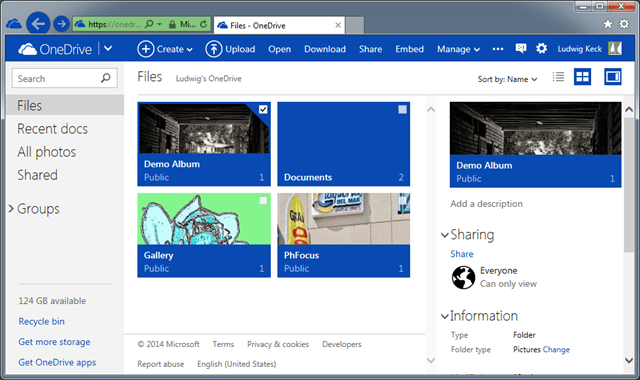
OneDrive-140612-08

Anything you put in this folder, including new folders, will also be public by “inheritance”.

Although your folder is public it is not easily found by others. Search engines do not show OneDrive folders. So you need to provide the link to you readers in your blog or on your site. If you don’t, it is like unlocking the backdoor to your store. You customers can’t find it unless they know the address of your place.

.:.

© 2014 Ludwig Keck

How do I send emails to a group?

Sometimes you need to act as the “town crier” for a group or want to send out emails to the same bunch of friends. Making sure that everybody is on the “cc” list can get to be a chore and it is easy to miss somebody.

Mail clients let you set up “groups”. In Live Mail they are called “categories”. So the first step is to collect your recipients into such a group. Then sending emails repeatedly to the same group is a snap. Here are the details for doing so in Live Mail.

Set up a group in Live Mail

  1. Open your Live Mail client program.
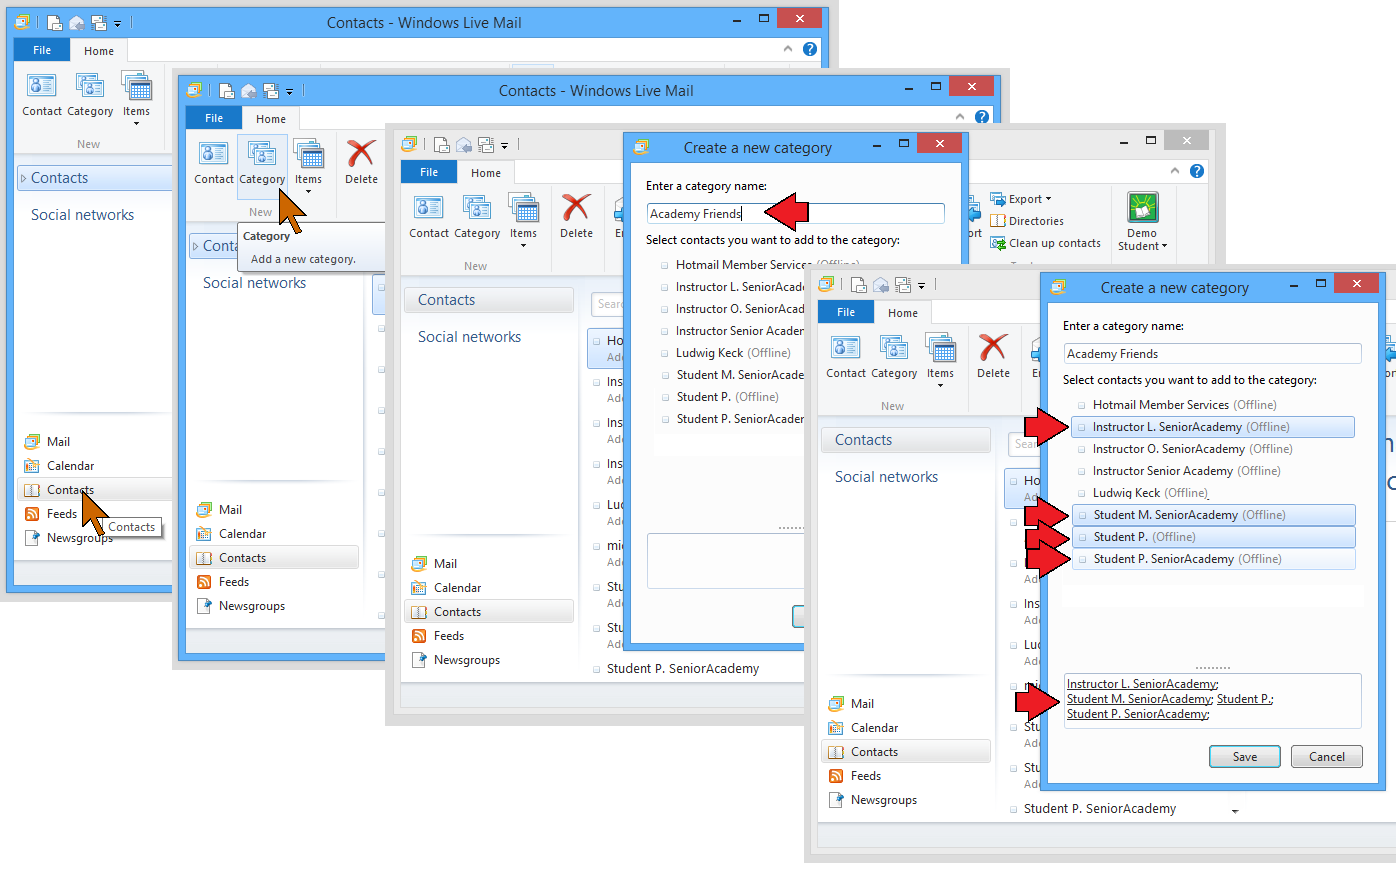
  2. Click Contacts in the lower part of the left pane (see illustration below).
  3. Click Category in the New group of the ribbon.
  4. A “Create a new category” dialog opens. There is a place to enter a name for the group. Do so.
  5. Your contacts show in the dialog. Click all the ones you wish to include in the group. The selected contacts will show up in the box toward the bottom of the dialog.
  6. You can type in email addresses of others in the box at the bottom. Separate them with semicolons.
  7. When you are finished adding recipients to the group click Save.

GM140207-11

That’s all there is to setting up a group.

Sending an email to a group with Live Mail

To send an email to the group is quite simple, but there are a couple of precautions to observe. You can prepare the email as you normally do, or even start by forwarding an email as you would normally. Here are the rest of the steps.

It is never good to show the email addresses of all your recipients in the emails. The proper way is to use “bcc” to hide the addresses.

  • Open Live Mail and start the new message as you normally would.
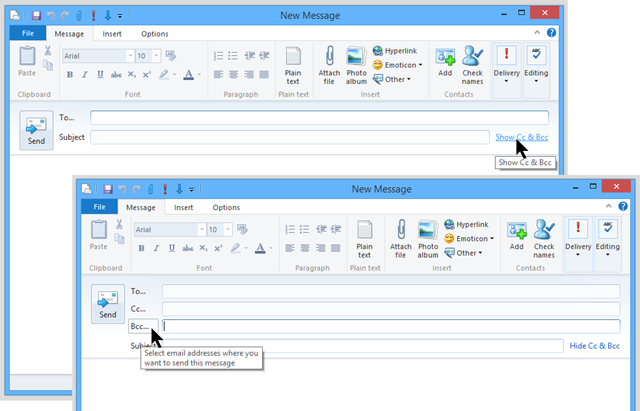
  • To the right of the Subject entry box click Show Cc & Bcc (unless the Bcc field is already open).

GM140207-12

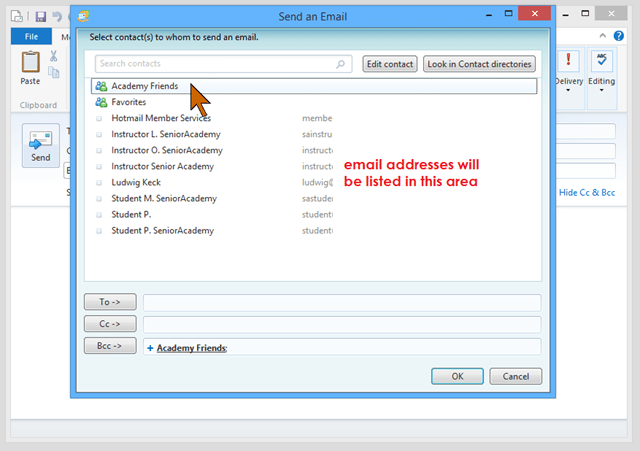
  • Click Bcc… in front of the entry field. This opens a new window showing your contacts including your groups.
  • Double-click the name of the group. The group will now show in the Bcc field at the bottom of the window.
  • Click OK.

GM140207-08r

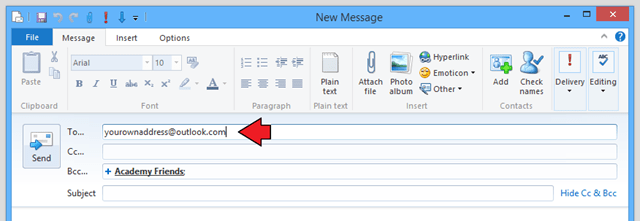
  • Add your own email address in the to To… field.
  • Finish the email and send it as you normally would.

GM140207-09r

Do remember that your friends don’t want to be spammed. Group mail should not be misused!

.:.

© 2014 Ludwig Keck

Technorati Tags: ,