Short answer: It doesn’t. — A tilt-shift lens does not correct the perspective distortion that we often call “falling-over building syndrome”. What it does is to let the photographer avoid the problem.
Here is an illustration of what we are talking about.
The narrowing at the top is just the way imaging works. You see it anytime you look up at a building. Our visual system interprets it for us when we stand in front of the building, but when we see it in a photo it just doesn’t look right.
The problem arises from titling the camera upward. If the plane of the sensor is parallel with the vertical structure, there will be no falling-over building syndrome, “FOBS”.
This photo illustrates how buildings look “right” when the camera is not tilted, held level and aimed so the horizon is in the middle of the frame.
Buckhead
We get way too much sidewalk that way, but it works! Cropping can get us what we want.
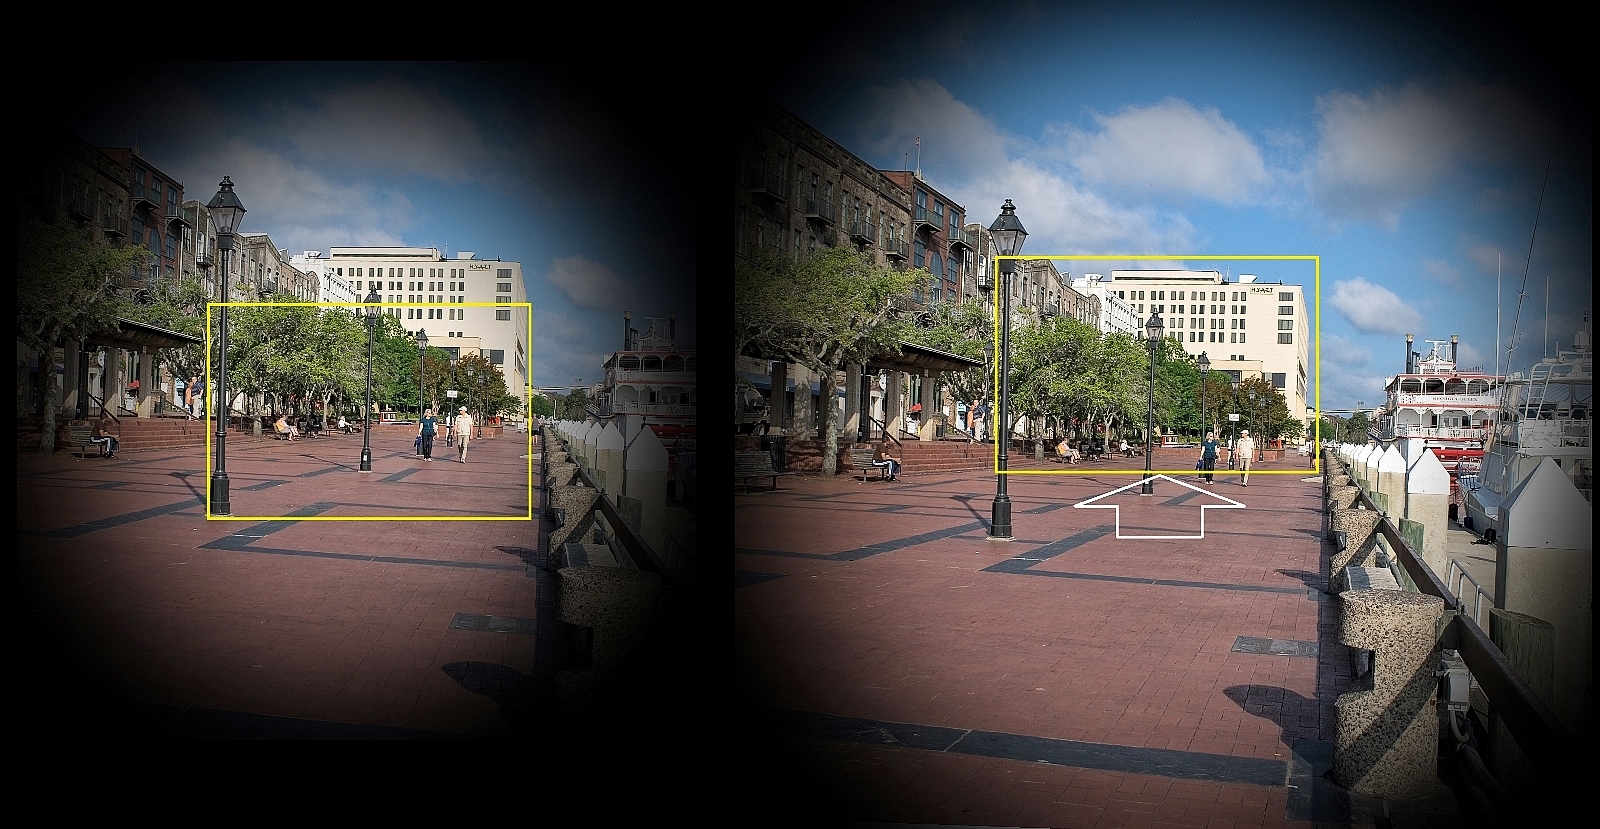
Sometimes the camera angle of view does not include all we want when the camera is level. Here is an illustration of that.
The left image models the view with a regular camera lens. The yellow frame simulates the sensor size and shows what the result would be. Note that the building is only partially included.
On the right is an illustration of what shifting of the lens accomplishes. The image is shifted relative to the sensor so all of the building is within the frame. Only the lens shifting is needed for this “correction”, the tilting part of the lens is not used for avoiding the perspective distortion.
There is also a hint there that the image size produced by a tilt-shift lens is much larger than what is produced by a normal lens. The reason, of course, is so different parts of the image can fully illuminate the sensor when the image is moved around. This also makes the optics of such lenses more demanding and expensive.
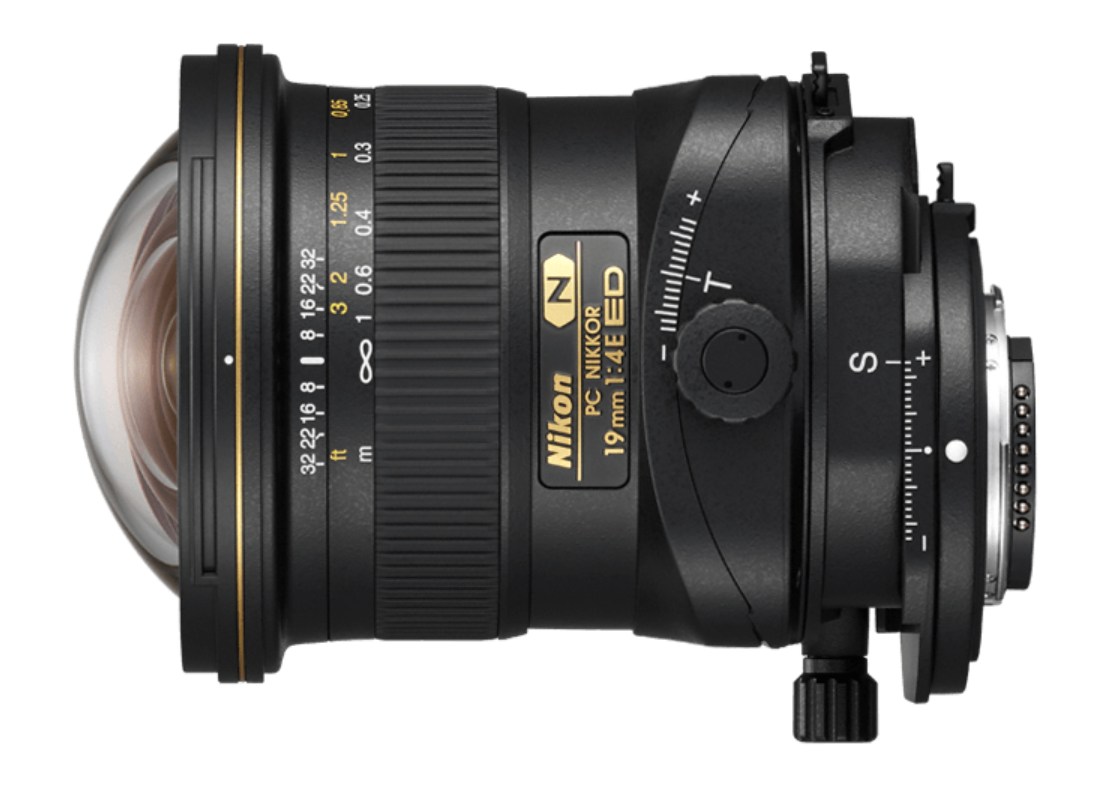
This is a photo of the Nikon PC Nikkor 19mm 1:4 E ED wide-angle tilt-shift lens. Notice how the whole lens is shifted relative to the lens mount. The range of this lens is 12 mm in either direction. That is half the height of the full frame sensor (about 24 by 36 mm). If you do architectural photography this is a very useful tool.
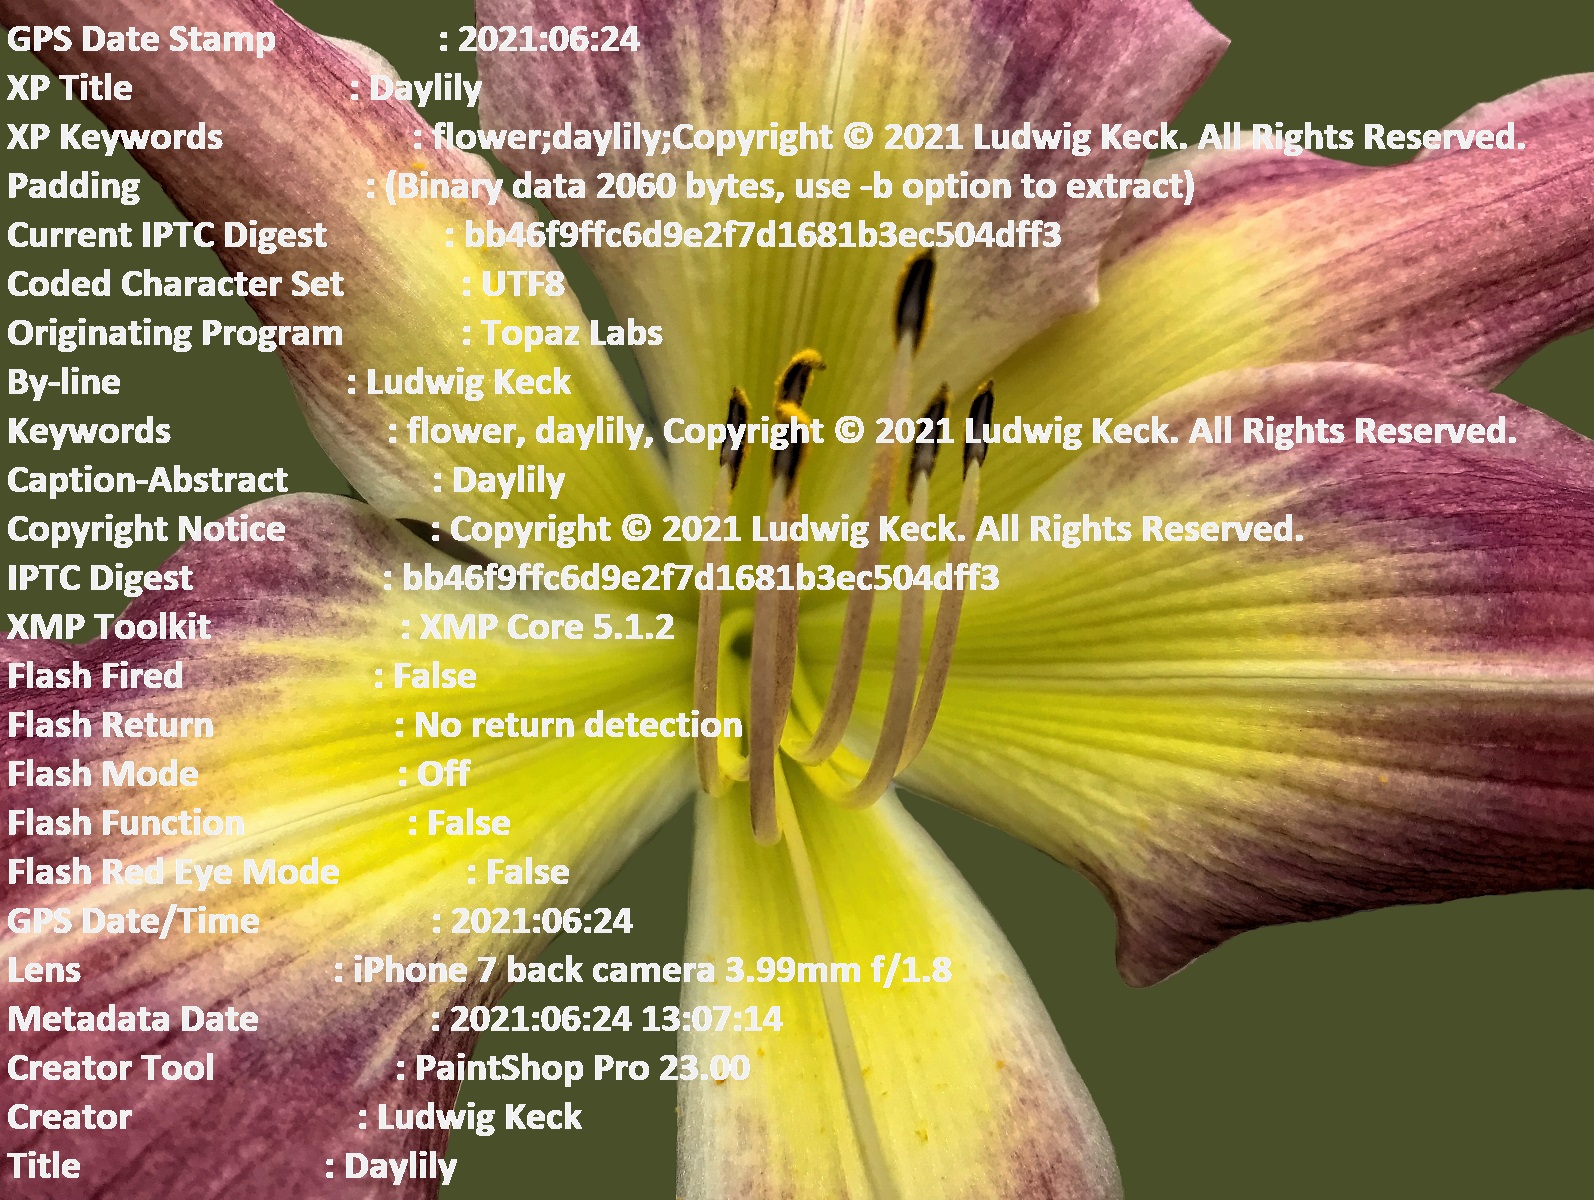
Photo files contain a lot of information besides the image. We generally refer to that as the EXIF data although there is actually a lot more, a better term to use is metadata. Cameras add data about the camera and its settings in an area outside the image data. Smartphones do the same and also add GPS data to show exactly where the picture was taken. The apps used to do post-processing add entries of their own, delete some that are there, and alter some information. We all like to add some tags, comments, titles and descriptions of our own. By the time a photo is ready for sharing on the internet it carries quite a data load.
The photo illustrating this post has a small portion of its metadata superimposed. I ran it through several apps and did a variety of processing including removing the background, enhancing the colors, sharpening and noise removal. Then I sized it down for online use. When I was finished the metadata was 10.1 kilobytes in size. How do I know> I use an app called EXIF Tool. That app can list pretty much all metadata that can be found in a file. It can also be used to add or remove data. More on that shortly.
Since much of this data is personal to us it might not be good to share all that on the internet. There are a number of ways to modify the metadata. I will share here just two approaches for removing metadata. I will also limit this discussion to JPG photo files and Windows PCs as the storage and processing devices.
The Windows “Properties” App
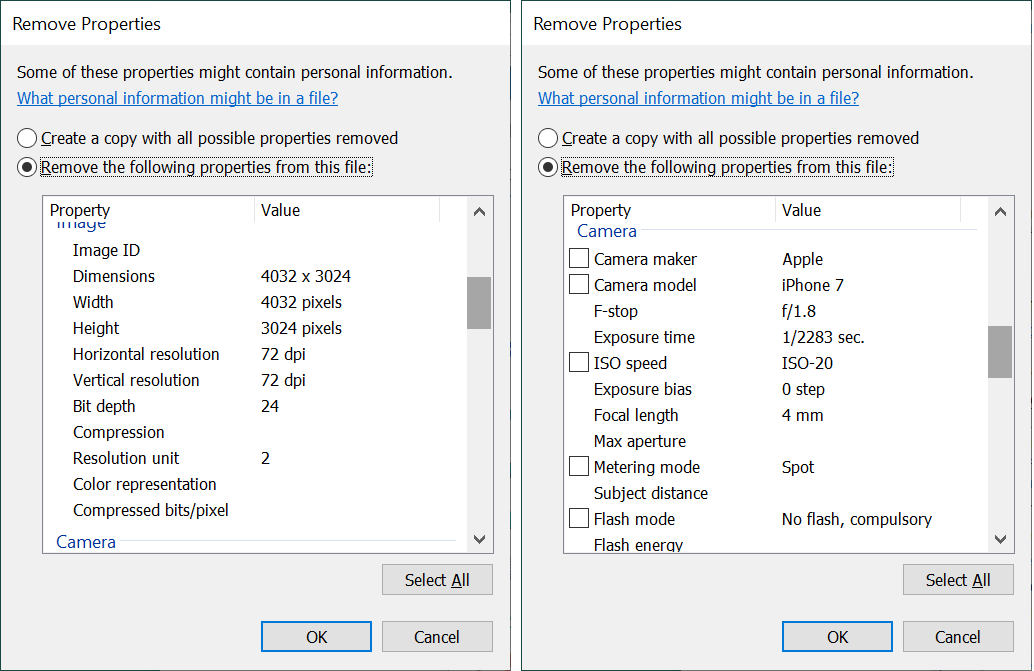
When you right-click an image file a small menu window pops up. The last option is “Properties”. Clicking that choice brings up a small window something like this example shown on the left:
Notice that option on the bottom: “Remove Properties and Personal Information“.
Clicking that brings up another window, as shown on the right above, with options.
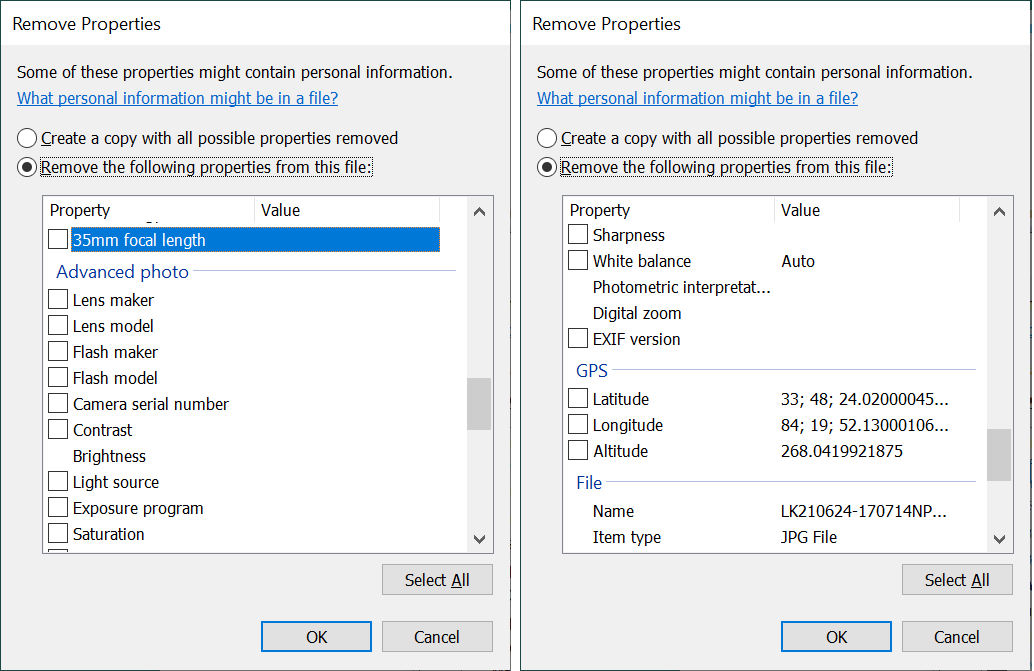
The default option is “Create a copy with all possible properties removed“. It turns out that “all possible” is a rather limited promise. When you click the second option, “Remove the following properties from this file:” That allows you to scroll through the many data items. Those that can be removed have a check box in front. There are many other properties that are not listed. Some of the listed options are shown in the illustration on the right above. You can see the other data items for our sample photo in these illustrations.
Removing “all possible” data from our sample photo file reduced the metadata to 7.99 kB. Nearly 80% of the data remained in the photo. This method did remove personal information and location data and most of the photo information. What was not removed included all sorts of information generated by the post-processing apps, like a history of all the steps done. You might not want to share all the steps you did in making your photo into your masterpiece. So you might want to remove all that is still in there.
Using ExifTool to remove metadata
The program ExifTool is a very powerful application. There are many option and if you look at the instructions for its use, you will be tempted to throw up your hands. Yes, this tool is for the geeks and nerds, but it can be used by normal humans. You can download the tool from exiftool.org. The downloaded file is a zip file. Move it to a convenient folder and extract the contents (right-click > Extract All).
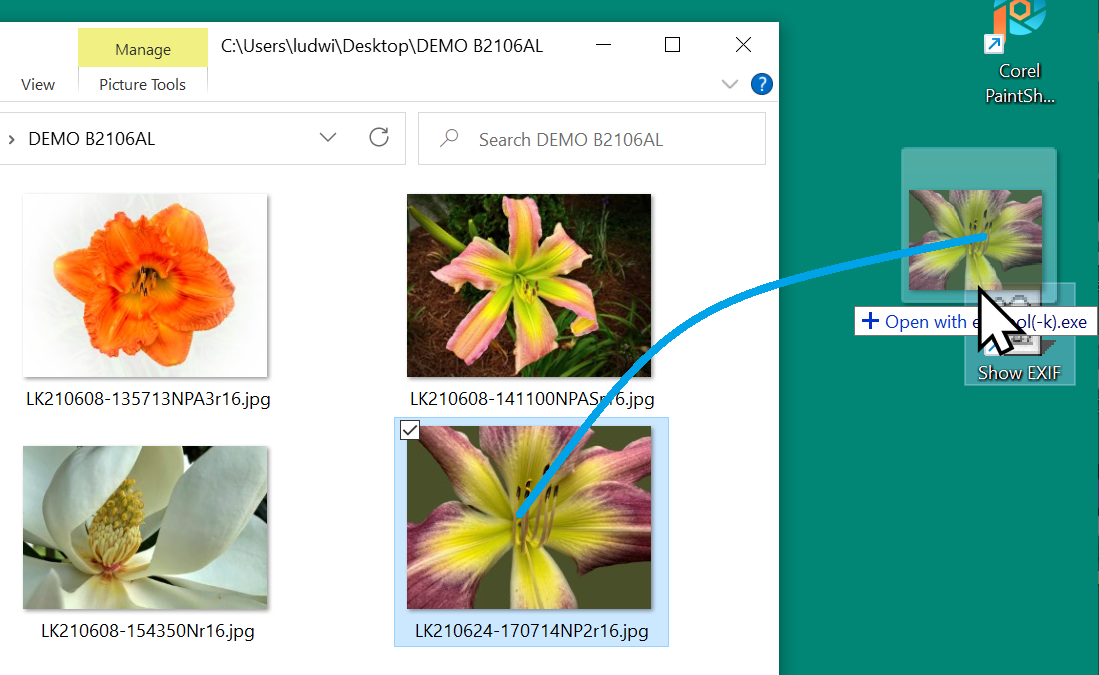
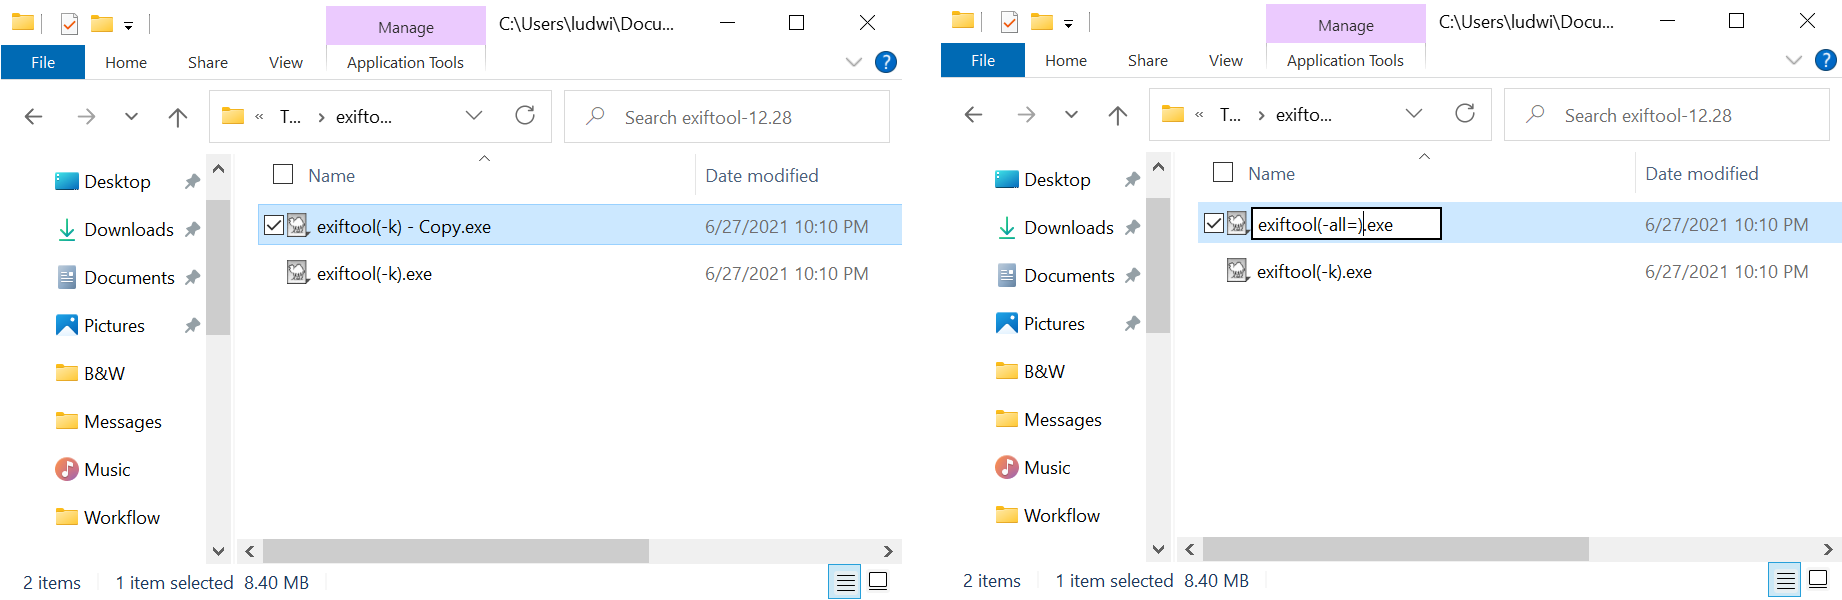
The extracted contents consists of just one file with the strange name exiftool(-k).exe.
Right-click on that file and select Send to, then Desktop (create shortcut). You might want to rename the shortcut something like “Show EXIF“. Really, that all there is too it for the option that shows the metadata in a file. All you need to do is drag the thumbnail from the directory to the desktop shortcut.
The first time you do that Windows will complain. In that window click More Info. In the next window click Run anyway. See the illustrations below.
The tool will run and you will get the listing of the metadata in a CMD window. On subsequent attempts the warning window will not show, the tool will run right away and you will get your information.
So far what I described is a way to see the metadata. To remove it takes another bit of “installation work”.
Installing the Metadata Removal option
Here are the steps for adding a removal tool option. Please follow them carefully.
Open the folder where you installed ExifTool.
Copy the file – Ctrl-C.
On an empty spot in that folder paste the copied file – Ctrl-V.
Right-click the file copy and select Rename. The file name will be highlighted so you can edit it.
Rename the file so that the new name is exiftool(-all=).exe
Make absolutely sure that the new file name is as specified above, including the hyphen and the equal sign.
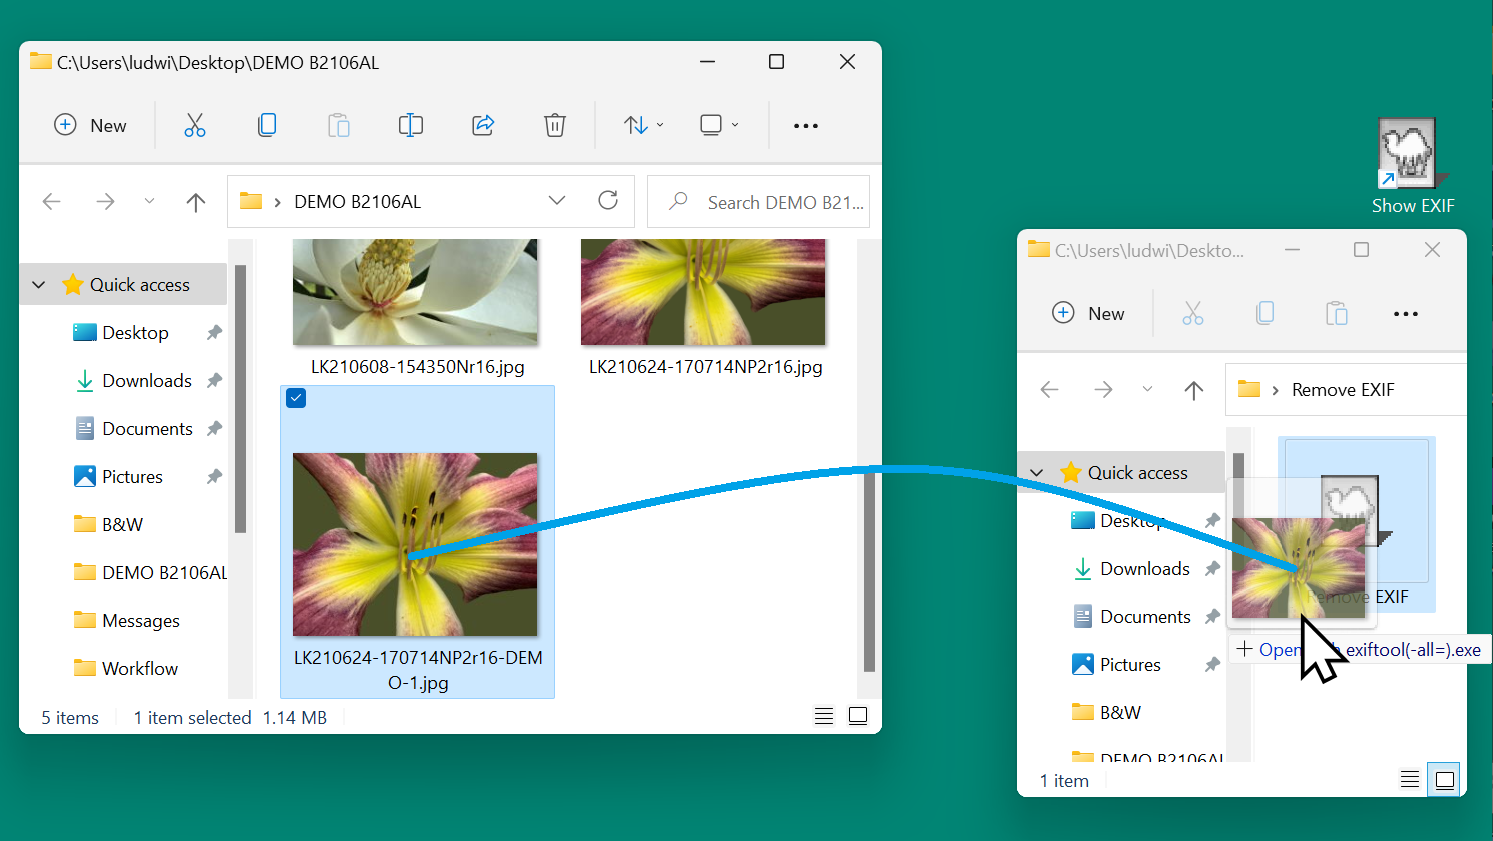
Make a desktop shortcut just the way you did before.
Make a folder on the desktop (right-click an empty spot > New > Folder ).
Give the folder a name like “Remove EXIF“.
Drag the new shortcut into this folder.
Rename the shortcut something like “Remove EXIF“.
Do I see your hand raised up trying to interrupt me? You are saying that renaming a file can’t possibly make it function differently? Back in the days of the old bard “a rose by any other name smelled just as sweet”, but in this day and age with very clever programmers, what you have done is indeed changing the function of the file by just renaming it.
You now have an extremely powerful tool that can remove the metadata and leave just enough to allow an image file to still function normally. So let me tell you a little more and also allow me to admonish you.
DANGER – DANGER – DANGER
Using this tool can damage files beyond repair.
Never remove the metadata from your original files.
Never remove metadata from RAW files (as produced by your camera).
Never remove metadata from intermediate post-processing files.
If anybody else, especially a child, has access to your computer, remove this file to avoid catastrophies.
Always prepare copies of your files. Remove the metadata only from final copies.
How do you use it?
Open the folder with the photos you wish to strip of their metadata.
Open the folder with the ExifTool for removing the data.
Drag the thumbnail of the photo over to the ExifTool.
That’s it.
Why do I have you put the removal tool shortcut into a folder? So it takes an extra step and so that you are sure of what you are doing.
When you then drag the photo thumbnail to the viewing tool, you will see what metadata remains. It will look somewhat like this:
Just in case you ignored all my warnings and stripped the data from a photo that you should not have, there is a safety feature. Inspect the screen capture above. Note the added file in the photo folder with the funny name. The ExifTool made a copy of the file as it was before the metadata was removed. It appended “_original” to the filename extension. If you edit the filename and remove that part, what you have is the file as it was before the operation.
Now you can relax and go about removing metadata from photos.
WordPress offers an amazing array of features and options on WordPress.com sites. Unless you are using the upgraded, pricey, Business plan (or higher), plugins to provide more options are not available.
Most themes that allow a logo to be displayed have a fixed, dinky, size for the logo. On the Twenty-Twenty-One theme it looks like this {using a a rather wide, low-height logo image):
Without any logo the appearance is plain and uninspiring.
How about using the logo as a background image? That would allow the logo to be sized in the uploaded art and get it just the desired size and placement. That gives us this:
The title block overlays the background image with the site name and menu over the logo art. Not at all acceptable.
Now you may have noticed that when a logo is displayed there is a wide strip provided for it. Can we get that strip even when no logo is used? No, there is no provision for that. However, there is a way!
What if we use a logo that does not show? A transparent image with nothing in it does the trick.
For this site, and this demonstration, I made a 800 pixel square PNG image and made it fully transparent.
And, voile, we have a site with a custom-size “logo”. A transparent image set as the logo in Site Identity and an image with the desired logo set as Background Image. The settings Fit to Screen with position top center and Repeat Background Image unchecked.
Note that the image was wide and not very tall, designed to fit just right.
There you have it. A way to size the logo your way.
Cameras typically have a “Mode” dial, although on some the modes are selected on the display. The mode control selects how exposure is set and looks similar to the illustration here.
The mode control has two areas, except for the professional models that have only one, more on that momentarily. One area, shown here with the icons on the dark background, has the automatic exposure modes. From AUTO to the tulip. In any of these modes the camera makes all the decisions. Pretty much all of the time that results in a fine photo. The icons let the photographer tell the camera what the subject is so the camera can make even better choices.
The other area on the exposure mode dial, here with the white background, shows the modes that put the photographer in control – with the camera helping. These modes are typically labelled M, A, S, P. On Some cameras the settings are M Av Tv and P. These are the modes found even on professional models.
M is manual mode. The photographers sets everything, aperture, shutter speed, ISO sensitivity. The A (Av) mode is aperture preferred. The photographer set the aperture and the camera picks an appropriate shutter speed that gives “correct” exposure. In S (orTv) mode is shutter preferred. In this mode the photographer picks the shutter speed and the camera chooses the aperture.
That get us to mode P, or “Program” mode. This is a somewhat automatic mode. The camera picks both shutter speed and aperture, but the photographer can vary the settings, usually with the control wheel.
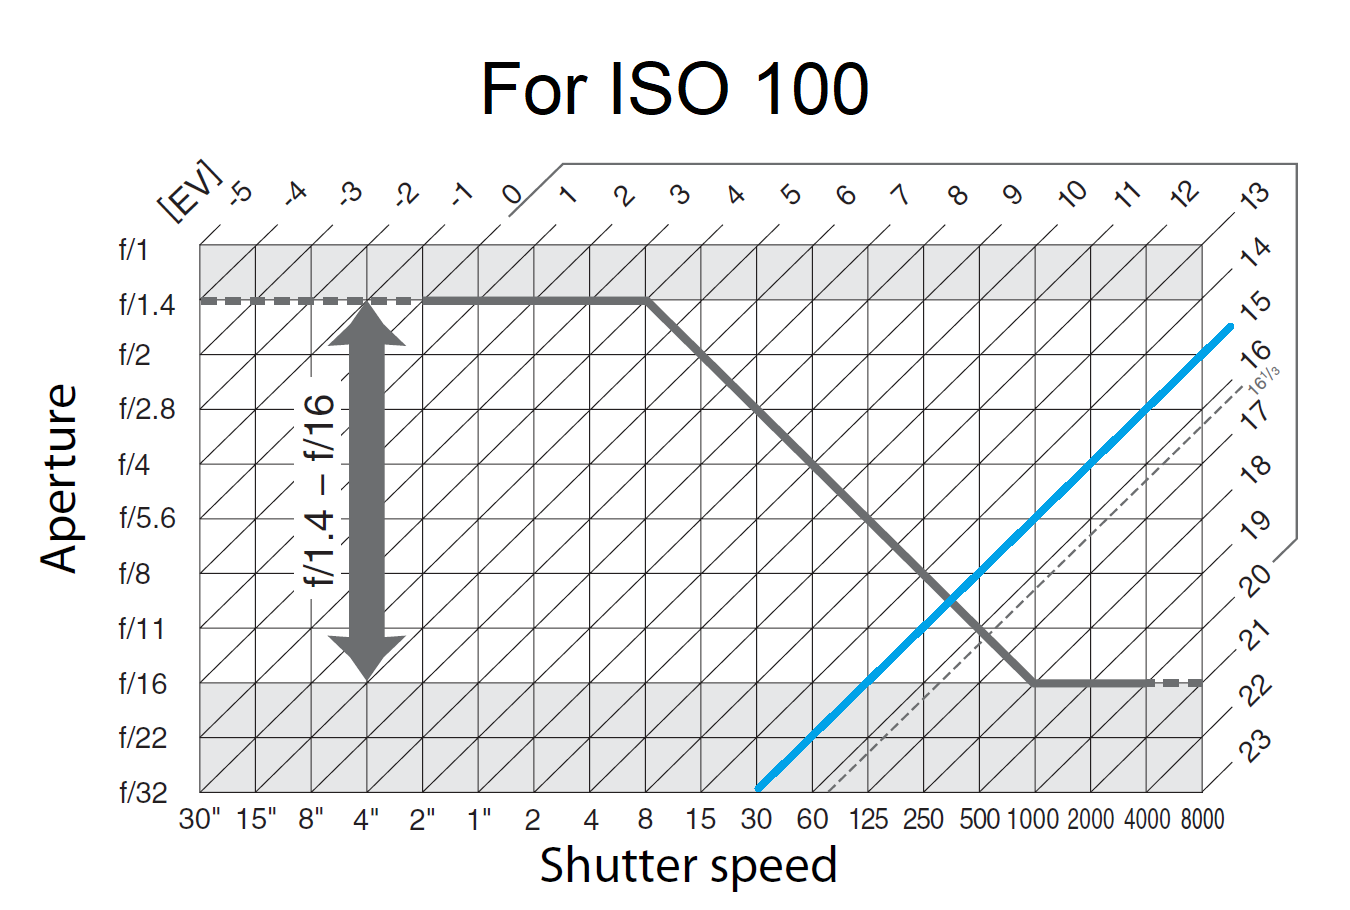
So what does the camera pick? – That depends on the ISO sensitivity setting and the scene brightness as measured by the camera. Most manuals are not very informative and neither are many of the training tutorials. For my old Nikon D800 the manual contains this graph (I have added the blue line and the ISO label.
What this tells you is that the camera works along the heavy black line. This is when the camera is set to ISO 100. It will pick a point along this line as determined by the scene brightness. Scene brightness on this chart is represented by the EV scale, shown with diagonal lines labeled from -5 to 23. Each increment on this chart is an EV step or stop, meaning a difference in brightness by a value of two, just like the steps on the aperture and shutter speed controls. An EV of 15 corresponds to bright sunny daylight. In your living room with the lights on you probable would have an EV of about 5.
So by this chart in daylight, EV 15, the camera picks an aperture setting halfway between f/8 and f/11 and a shutter speed halfway between 1/250 sec and /1500 sec. That is where the blue line crossed the heavy black line. If a cloud comes over and it gets a little darker the camera will pick a spot along the black line toward the left and the top. For half the light, that is one stop less light, the camera will open the aperture one half stop and increase the exposure time by the equivalent of one half stop.
The heavy black line goes horizontal at the maximum aperture that the mounted lens provides. It is drawn here for an lens that is f/1.4 at the widest. It will increase the exposure time by one stop for each stop less available light.
Similarly on the other end, at high levels of light, the camera will not stop down below f/16 and compensate for the change in light with shutter speed alone.
But wait, there is more!
In this P-mode, the camera control wheel will let the photographer vary the aperture and shutter speed, making the compensation in one for a change in the other.
Look at the blue line, the one I added to this graph. This is the EV 15 line, for a typical sunny daylight scene. The camera picked the point where the heavy lines cross. The control wheel allows moving up and down along the blue line. Notice that the aperture and shutter settings along this line all give the same exposure. So the photographer can pick either the aperture or shutter speed needed while the other parameter is set to maintain the same exposure.
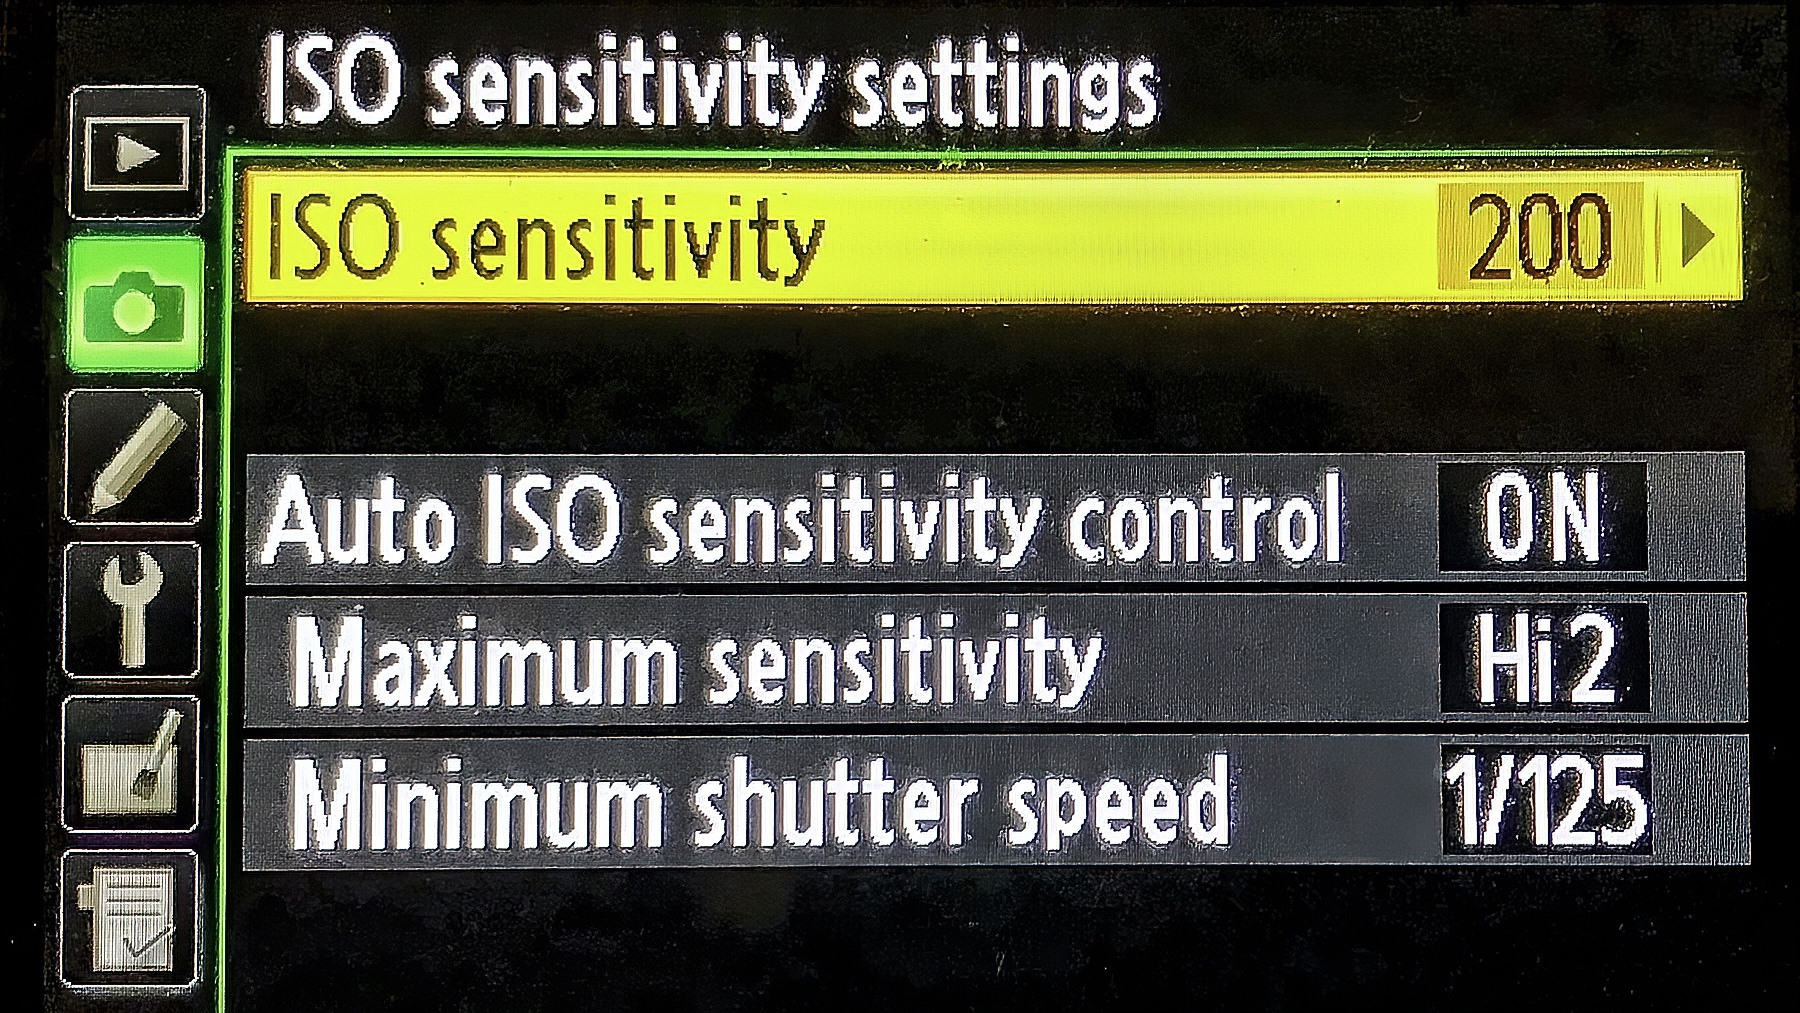
There is still more. Many cameras allow “auto-ISO” and can also set the slowest allowed shutter speed. When that limit is reached at low light levels – along the heavy black line – the camera will increase the ISO to maintain the exposure.
P-mode is a semi-automatic mode freeing the photographer from fussing with the camera and concentrating on the subject being photographed. It can thus lead to better results. So P-mode is “pretty professional”. Use it. You will grow to like it.


 .:. © 2022 Ludwig Keck